Graphics Reference
In-Depth Information
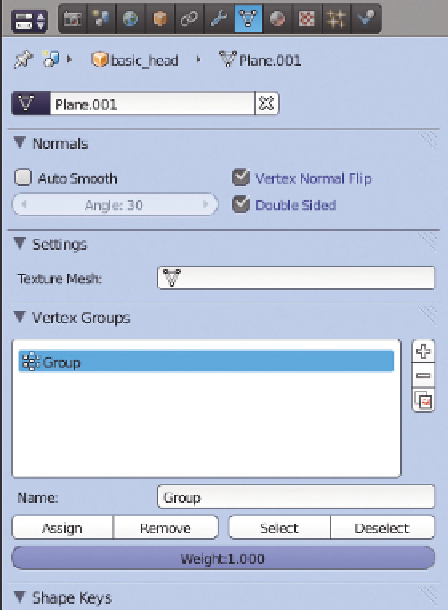
Tab into Edit mode on the head, causing the hair
to temporarily disappear, as particles are only visible
in Object mode. In the Properties window, switch
contexts from Particles to Object Data properties
(the little mesh triangle icon). You'll note that one
of the panels there is called
Vertex Groups
and
sports the same multisetting interface you just
encountered with particles. Click + to add a new
vertex group.
Figure 6.34
shows the panel.
Vertex groups are named collections of vertices. You
can think of it as a way of “saving” mesh selections.
For example, let's say that you keep tweaking the
mesh of your table model. You're just not happy with
it and always going back to shrink or grow the central
column. Of course, every time you do it, you need
to reselect the column. It would nice if there were a
way to store that selection, and in fact there is.
LMB the vertex group in the panel that you just
created, called “Group” by default. Change its name
to something descriptive like “hair density” in the
name field. Now, in the 3D view use the selection
tools to select the faces from which you would like
hair to grow.
Figure 6.35
shows just such a selection.
When you're done, LMB click the
Assign
button on the Vertex Groups panel. This “saves” your current
selection into the vertex group named “hair density.” Want to test it? Deselect the mesh with a tap of the A
key, then click the
Select
button on the panel. The selection returns! Magic (that is, for certain values of magic)!
Figure 6.34
The Vertex Group controls.
Of course, you can do more than that with the Vertex Groups panel, and you probably will. For example,
if you add a vertex that you don't want in the selection anymore, you can select it (by itself!) in the 3D
view, then click
Remove
. That says, “Take whatever the current selection is and subtract it from the
current vertex group.” Your meshes can have many vertex groups, as many Blender features use them for
different things. To manage them, just remember to first LMB click on the vertex group name in the
chooser, then make your adjustments. You can also access a number of vertex group-based operations
from the 3D view by pressing
Ctrl-G
while in Edit mode.
Jumping back to the particle controls, you can now click on the field beside
Density
in the
Vertex Groups
panel and select the group called “hair density” (or whatever you named it). Tab out of Edit mode and …
magic again! The hair growth is now restricted to the faces you selected and saved as a vertex group.
Vertex groups do not need to be an either/or proposition, especially when used for something like hair
density. You might want to have different portions of your mesh have a hair density somewhere between
“none” and “all.” You accomplish this with the
Weight Painting
mode.
Search WWH ::

Custom Search