Graphics Reference
In-Depth Information
value until you have some-
thing that resembles
Figure
6.21
. The feedback is imme-
diate, and you can adjust it
back and forth without having
to use Undo if you go too far.
When you have it nicely
smoothed (perhaps around
Repeat: 8), hit the Apply
button on the modifier to
make the results real. Jump
back into Edit mode, and
hooray for using modifiers as
modeling tools!
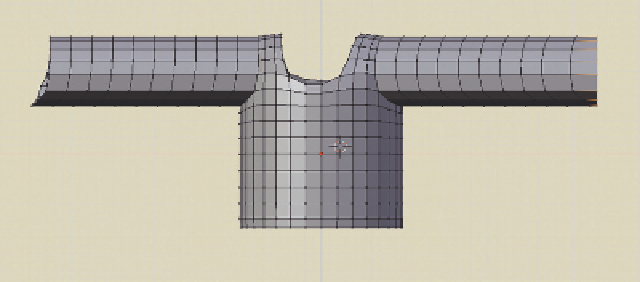
Figure 6.22
Sleeves.
Alt-RMB clicking (loop select) grabs the entire ring of vertices around the arm opening at once. An
Extrude command (E key) creates a long, narrow sleeve. A multiple loop cut later and the sleeves are
ready for shaping.
Figure 6.22
shows the sleeves extruded and gently sliced. The sleeve on the left slopes
outward toward its bottom, while the one on the right seems to line up properly. To accomplish this, use
Alt-RMB again on the end of the sleeve to select the vertices around its circumference. In a front view,
press the S key, followed by the X key to constrain along that axis. Then, type 0 (the number zero), and
the edge of the sleeve will line up perfectly. If you like, you can do this to every loop along the length
of the sleeve.
We still need to add a collar, optional details like buttons/pockets/etc., and push it into a form that more
closely resembles a shirt. The pushing needs to happen first, though, as the other steps involve overlapping
geometry. Collars, certain kinds of cuffs, hems, and other details all involve geometry that overlaps the
base fabric of the shirt, and trying to prevent all of that from self-intersecting while changing the overall
shape can be a nightmare.
Figure 6.23
shows a 3D view set to display two reference sketches of the example character's whole body.
By using the same techniques that you learned when matching the base head model to sketches, you match
the rough clothing to the finished shape in the sketch. Mostly, you'll be grabbing single vertices with
Proportional Editing Falloff enabled and pulling them into position. The Web Bucket has a video of this
very thing called
matching_a_shirt.mpeg
. Both the rough starting shirt and the sketch reference are available
too, in case you want to practice this step.
If you're not very good at drawing clothes (and unless you're a careful observer you probably won't be),
an easy reference can be obtained by having someone stand in the character's pose and taking a digital
picture of them. It really couldn't be easier.
Note:
A character's initial pose. When creating a character, you should begin with a neutral pose. The
most common is the one seen in this chapter: legs apart, arms outstretched, elbows and knees slightly bent,
Search WWH ::

Custom Search