Graphics Reference
In-Depth Information
then use Alt-D to create instances of it, one for each wall. Arrange
them all pointing inward, like
Figure 5.26
. Choose one of the
horizontal-facing lamps, use Shift-D to duplicate it, and move it
below the room, rotating it to face upward. You may have to adjust
the Clip Start and Clip End values now to take the height of the
room into account. Once again, the Clip Start should begin just
above
the level of the floor. As a reminder, you use Shift-D to create
this duplicate instead of Alt-D, so that when you adjust clip values
the other lamps aren't affected. All four of the lamps for the walls
are instances, which means that you can easily adjust the overall
“reflected” lighting in the room by changing the values of just one
of them.
Later on, when we begin to assign different surface properties to
objects, including the walls, floor, etc., we can set these lamps to
mimic the colors that would be subtly reflected. For example, a red
carpet would mean that the lamp shining upward should receive a
reddish cast. As before, it should not be overwhelming, and resist
the urge to make it “show off.” Subtlety is the rule of the day.
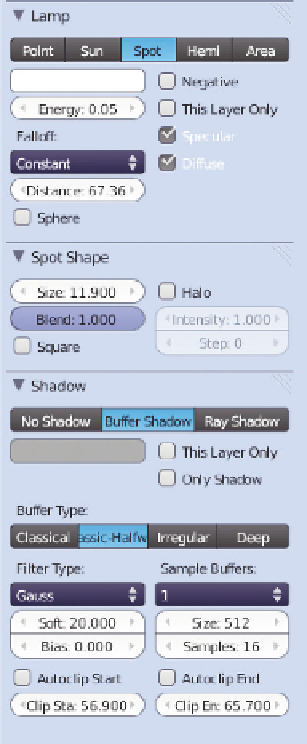
Let's turn on the table lamp. This is done with a placement of three
different Blender lamps. Two shadow buffered spot lamps provide
most of the lighting, one facing up, one facing down.
Figure 5.28
shows the exact configuration, including the lamps' properties panel.
You don't have to make the lamp cones line up exactly with the
lamp shade—you're just going for an approximation of the effect of
the shaded lamp. The buffered shadows, the settings of which you
can see in the figure, do most of the work here. The final touch is
to add a dim point lamp where the table lamp's lightbulb would be,
without using shadows. It provides some overall illumination to fill
in areas that are completely in shadow. Don't forget to set lamps like this to mimic the color of the real-
life light source.
Figure 5.27
The lamp settings for the
“ambient” lights.
Take a final look at the interior lighting generated by this whole setup, in
Figure 5.29
. It's certainly not
fancy, but realize that we haven't even begun to apply surfaces to our objects. The right “feel” is there,
so we can proceed to other steps in scene production with confidence.
But what if there is a window (or windows) with natural light? Let's return to the scene and change that
lamp shade back out for the flower. By using perpendicular double loop cuts, edge slides, and removing
a single face, we create a window.
Figure 5.30
shows the windowed room, along with the lighting.
Once again, we create a base of illumination with approximate environment lighting, this time bumping
the energy up to around 0.2. Remember that we're only using environment lighting to brighten the
Search WWH ::

Custom Search