Graphics Reference
In-Depth Information
effect. When this happens, the correction value will
help to fix it. When using environment lighting as a
basis, starting with this value set to 1.0 (the maximum)
will be fine.
Color:
The system generally just adds “white” light to your
scene. You can, however, use the sky color for a little
more realism. By setting the Color control to Sky
Color or Sky Texture, Blender will use the appropriate
colors, as though the sky were truly illuminating the
objects in the scene. In
Figure 5.20
, you can see the
effects of using a sky with a blue zenith and green
horizon. There are no other textures, colors, or lights
in the scene. The colorization on the objects is entirely
due to the environment lighting. Note that the Sky
Texture option does not work with approximate
gathering.
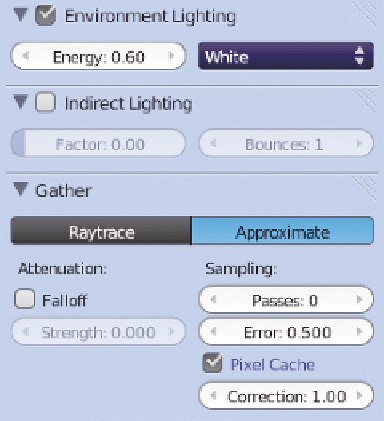
Figure 5.19
Approximate gathering controls.
As you've looked at these panels, you've
no doubt noticed the Ambient Occlusion
and Indirect Lighting options. Ambient
Occlusion is useful for adding the same
type of inside angle shading you see with
Environment Lighting, but without
adding any additional light. If you are
lighting your scene completely with tra-
ditional lamps, but would like the nice
contact shading effect, use Ambient
Occlusion. Indirect Lighting can actually
simulate light bouncing, but is still under
heavy development in Blender and not
really ready for inclusion in your scenes
at this point. Check the Web Bucket
video
global_illumination_developments.mpeg
for the latest on developments in this area.
Figure 5.20
Using Sky Color with AO.
An Effective General Outdoor Lighting Setup
Let's move our scene outdoors for a moment. You can do this by selecting the room object and sending
it to another layer with the M key. If you like, add a sphere (Shift-A), smooth it, scale it way up (S key),
squash it in the
z
direction (S key, Z key), and move it down (G key, Z key) until it makes a nice ground
for the table and chair to rest on.
For your reference throughout this section,
Figure 5.21
shows the setup we'll be building in the 3D view. If
you would like to see individual renders for each stage, you can grab them from the Web Bucket for this chapter.

Search WWH ::

Custom Search