Graphics Reference
In-Depth Information
the real world has a perfectly turned
corner or edge. Glass can. Finely honed,
hard metals, possibly. Everything else
exhibits a slight rounding on what we
would normally consider a sharp edge. In
the real world, this grants a certain high-
lighting style to most things we see. Our
brains don't perceive that tiny surface as
there, but we sure miss it when it isn't.
Beveling objects in your scene that have
“sharp” edges but that aren't made from
very hard materials will increase the
believability of your renders. You don't
need to go crazy with it, but a little can
make a big difference.
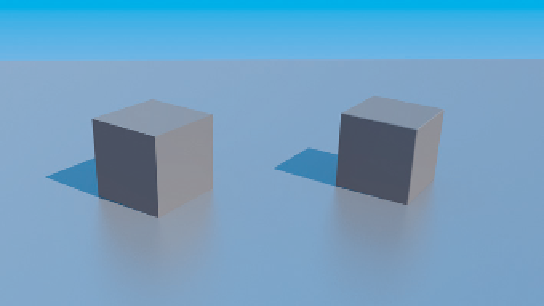
Figure 4.42
shows two simple cubes, one beveled, one not. Believe it or not, that
subtle bit of shading along the edge of the beveled cube on the left can make a huge difference in the
eventual quality of your renders.
Figure 4.42
Two cubes, one with a beveled edge.
In its default state the Bevel modifier will put a bevel on every edge in the entire object, even ones that
lie along a flat surface. This is a waste. Ideally, we'd like to just bevel the more pronounced edges of the
object. Switching the Limit Method of the modifier to Angle allows you to do this. Simply choose the
minimum angle for a bevel in the Angle property, and you're set.
Putting the Table Together
So you now have three different sections of a table: the top, the legs, and a center column. Before you
join them, select each one individually and apply any modifiers that remain in effect. Remember to apply
them from top to bottom to maintain the proper order of effects. When all of the modifiers for all three
objects have been applied, it's time to put them together.
RMB select one of the objects, then Shift-RMB select the other two so that all three are a part of the
selection. Ctrl-J, the Join operation, merges the objects into a single mesh. Depending on your smoothing
settings, you may or may not see a difference in appearance when you join the objects. They will all take
on the smoothing and shading attributes of whichever object was active in the selection.
To even out the appearance, let's use that last modifier we mentioned earlier. In Object mode, use the
Smooth tool from the Shading section of the tool shelf. Most likely, this will make your model look a bit
odd. Even very sharp edges are shaded “smooth,” which doesn't look right. In the Properties window,
give this table object an Edge Split modifier.
Edge Split does the hard work of breaking up the shading surfaces of your model. With an entire model
set to Smooth shading, Edge Split allows you to set an angle at which smooth shading breaks. In the case
of our table, the default works fine. Surfaces that should be smoothed appear to be so, while edges appear
as actual edges. If you run into complex cases where you want to define nonsmoothing edges more exactly,
Search WWH ::

Custom Search