Graphics Programs Reference
In-Depth Information
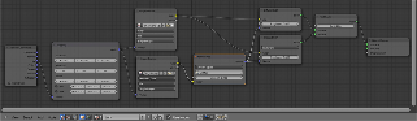
4. Connect the
UV
output of the
Texture Coordinate
node to the
Vector
in-
put socket of the
Mapping
node and the output of the latter to the
Vector
input socket of the
Image Texture
node. Connect the
Color
output of the
Image Texture
node to the
Color
input sockets of both the
Diffuse
and
Glossy
shader nodes.
5. Click on the
Open
button of the
Image Texture
node, browse to the
tex-
tures
folder and load the
bark_color_tile.png
image.
6. Press
Shift
+
D
to duplicate the
Image Texture
node and connect the
Mapping
node's output to its
Vector
input socket as well. Click on
the
2
little icon to the right of the texture image name to make the
node single user. Click on the
Open Image
button (the one with the
folder icon), browse again to the
textures
folder, and load the
bark_norm_tile.png
image. Set the
Color Space
to
Non-Color
Data
.
7. Add a
Normal Map
node (press
Shift
+
A
and go to
Vector
|
Normal
Map
), connect the
Color
output of the second
Image Texture
node to the
Color
input socket of the
Normal Map
node, and set the
Strength
value
to
2.000
. Click on the
UV Map for tangent space maps
button above
the
Strength
one and select
UVMap
(the trunk mesh has two different
sets of UV coordinates, as we'll see this later).
8. Connect the
Normal
output of the
Normal Map
node to the
Normal
input
sockets of both the
Diffuse
and the
Glossy
shader nodes.
9. Now, box-select all the nodes except the
Texture Coordinate
and the
Material Output
ones and press
Shift
+
D
to duplicate them. Move them
down. Connect the
UV
output of the
Texture Coordinate
node to the
Vector
input socket of the duplicated
Mapping
node and set the
Scale
value of the latter to
0.350
for all the three axes.
10. Add a
Mix Shader
node (press
Shift
+
A
and go to
Shader
|
Mix Shader
)
and paste it to the immediate left of the
Material Output
node. Connect
the output of the duplicated
Mix Shader
node to the second
Shader
input
socket of the last added
Mix Shader
node.