Graphics Programs Reference
In-Depth Information
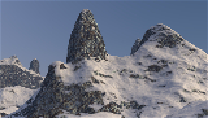
Creating a snowy mountain landscape
with procedurals
In this recipe, we will make a snowy mountain landscape by re-using already made
shaders, precisely the
Rock_procedural
and the
Snow
materials. We will improve
these materials by grouping them and exposing the useful values; we will then create
a new group node working as a stencil to arrange the snow in a more natural-looking
manner on the rocks, as shown here:
Getting ready
As usual, let's start with the preparation of the scene, even if in this case we start with
an almost readymade blend file:
1. Start Blender and open the
1301OS_05_rocksnow_start.blend
file,
where there is a scene with a placed camera, a simply modeled mountain,
and a plane already set as emitter.
2. Select the
Mountain
object, go to the
Object Modifiers
window and as-
sign a
Subdivision Surface
modifier. Set the levels for both for
View
and
Render
to
2
.
3. Assign a second
Subdivision Surface
modifier with the same settings
simply by clicking on the
Copy
button of the first one.
4. Assign a
Displace
modifier. Click on the
Show texture in texture tab
but-
ton on the extreme right of the
Texture
name slot to go to the
Textures
window and assign a
Voronoi
procedural texture. Set the
Size
value to
1.00
. Go back to the
Displace
modifier and set the
Strength
value to
-0.200
.
5. Assign a second
Displace
modifier, in the
Texture
window assign a new
Voronoi
texture and set
Distance Metric
to
Manhattan
and the
Size
value to
050
. In the
Displace
modifier, set the
Strength
value to
-0.050
.