Graphics Programs Reference
In-Depth Information
Creating
an
ocean
material
using
procedural textures
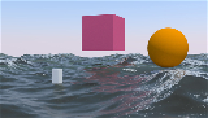
In this recipe, we will build an ocean surface material, using the
Ocean
modifier and
procedural textures to create the foam and establish a set of nodes to locate it on the
higher parts of the waves, as shown here:
Getting ready
Before we start with the shader's creation, let's prepare the ocean scene:
1. Start Blender and switch to the Cycles rendering engine. Select the cube
and delete it (press
X
).
2. Add a plane (have your mouse in the 3D window and press
Shift
+
A
and
go to
Mesh
|
Plane
). In the
Object
mode, scale it to
0.300
. Don't apply
size.
3. Go to the
Object Modifiers
window and assign an
Ocean
modifier. Set
these values:
Geometry
to
Generate
,
Repeat X
and
Repeat Y
to
4
,
Spa-
tial Size
to
20
, and
Resolution
to
12
.
4. Press
N
and in the
Transform
panel set these values for the plane's
Loca-
tion
:
X -6.90000
,
Y -7.00000
,
Z 0.00000
.
5. Be sure to be at frame
1
and place the mouse in the modifier's
Time
slot,
press
I
to add a key for the animation. Go at frame
25
, change the
Time
value from
1.00
to
2.00
and press
I
again to set a second key.
6. In the
Screen lay-out
button at the top, switch from
Default
to
Animation
.
In the
Graph Editor
window, press
T
and go to
Linear
and press
Shift
+
E
to go to
Linear Extrapolation
to make the ocean animation constant and
continuous.
7. Rename the plane as
Ocean_surface
.

