Graphics Programs Reference
In-Depth Information
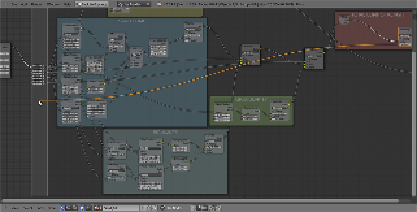
5. Now we need to expose the values to modify the material from the inter-
face. From the
Fac
input of the first
Multiply
node, click and drag a link
to the left border of the group. In the newly appeared input socket name,
enter
Big waves strength
. This value actually drives the strength (the
multiplication value) of the
Big Waves
bump summed to the main
Sand
Bump
.
6. Do the same with the second
Multiply
node and rename the input as
Granularity
. Again, this value will drive the amount of multiplication of the
sand grain to the rest of the bump effect.
7. Now click on the
Value
node inside the
Big Waves
frame and press
X
to
delete it. Click and drag to the border around the second
Value
socket of
the first
Wave
node and rename the exposed new socket as
Big waves
repeat
. Also, Click and drag a link also from the second
Value
socket of
the second
Wave
node and connect it to the
Big waves repeat
socket.
By clicking on the upper little arrow on the socket side, move it up just
before the
Granularity
frame.
8. We also need to expose the
Multiply
node inside the
Total Bump
Strength
frame, by dragging the second
Value
socket. Rename the new
socket on the interface as
Bump strength
. This is, in fact, the value for
the overall bump of the material.
9. Press
Tab
to close the group. On the interface we have the controls to
increase or decrease the overall bump effect, the sand grain, and the
waves' strength and scale/repetition. We can have exposed even more
values, for example, also the first bump amount for more finer tweaking,
and the two color inputs in the
Sand Color
frame.