Graphics Programs Reference
In-Depth Information
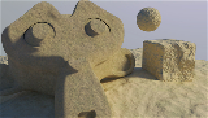
Creating
a
sand
material
using
procedural textures
In this recipe, we will create a sand material, good for close objects as for distant
ones:
Getting ready
To get ready, start Blender and switch to Cycles. Delete the default cube and add a
plane. In the edit mode, scale it nine times bigger (18 units per side).
1. Go to the
World
window and click on
Use Nodes
, then click on the little
square with a dot on the right-hand side of the color slot. From the menu,
select
Sky Texture
. Set the
Strength
value to
0.300
.
2. Select the lamp and go to the lamp's
Object Data
window and click on
Use Nodes
. Then change the
Lamp
type to
Sun
and set the
Size
value
to
0.100
and the
Strength
value to
2.000
. Change the light's color to
R
1.000
,
G 0.782
,
B 0.310
. In an orthogonal top view, rotate the
Sun
lamp to
45°
.
3. Place the camera to have a nice angle on the plane and switch the 3D
view to a
Camera
view (press
0
from numpad).
4. Add a cube and a UV Sphere to the scene and place them leaning on the
plane.
5. Select the cube and in the
Object Modifiers
window add a
Bevel
modifier.
Set the
Width
value to
0.0600
. Assign a
Subdivision Surface
modifier
and set both the levels to
2
. Assign a
Smooth
modifier and set the
Factor
value to
1.000
and
Repeat
to
25
. Press
T
to call the
Object Tools
panel
on the left, and under
Shading
select
Smooth
.
6. Split the 3D window to two horizontal rows and change the upper one to a
Node Editor
window and set the
Camera
view mode to
Rendered
.