Biomedical Engineering Reference
In-Depth Information
a manual drill (
Figure 14.3
A) which allows the surgeon to
progress at a lower but more controlled speed. Manual
drills do not cause bone overheating and the secondary
thermal damage and necrosis.
Two basic types of screws used in cranial implantation
are self-tapping and non-self-tapping. Self-tapping screws
do not require pretapping as they have the ability to
advance, while creating their own thread (
Aebi et al.,
1998
). Typically, the drilled pilot hole is slightly larger than
the core diameter and the screw edges cut a thread while
the screw is advanced into the cortical bone. The advan-
tages of using these screws include elimination of an
operative step (tapping), fewer instruments needed, ability
to remove and insert without weakening their hold in the
bone, shortened operative time, and potentially reduced
operative risk. The disadvantages include accumulation
and clogging the threads with bone debris and the hold
being possibly weaker compared to non-self-tapping
screws since their threads do not penetrate into bone as
deeply. Non-self-tapping screws require tapping of the
pilot hole, but they provide a tighter fit since the tap threads
correspond to the screw threads. The application of these
screws requires an extra operative step but allows for
greater precision. When drilling pilot holes, the outer
compact layer of a cranial bone will be penetrated and the
spongy, red bone marrow between the outer and inner
compact layers of the cranial bone will be entered. It is
critical not to drill through the inner compact layer of the
cranial bone. Before the insertion of a stainless steel or
titanium screw it is important to measure the depth of the
pilot hole and use the appropriate length.
Craniotomies (
Figure 14.4
B,C) can be accomplished
with a manual trephine, electric, or pneumatic drills.
Extreme caution is advised so as not to puncture or cut
the dura. Craniotomies inside a recording chamber can be
done before or after the chamber has been anchored. In
the latter case the bone is thinned down with a drill
(
Figure 14.3
B), and a 1- to 2-mm bone opening is made
first and the craniotomy is then enlarged to the desired
size by taking small bone bites using Kerrison rongeurs
(
Figure 14.4
A). Syringe-delivered cold saline and suction
will reduce overheating and the bone dust smoke gener-
ated during the drilling. While closing after craniotomy,
theboneflapneedstobereplaced and reattached with
microplates or straps and screws using muscle or muscle
fascia to cover up bone gaps. Synthetic sealing materials
such as Silastic are favored by some researchers for
filling bone gaps before closure. The authors believe that
these materials contribute to local inflammation and
possibly enhance foreign body tissue reaction, interfere
with bone healing, and result in the retraction of the skin
and other soft tissues away from implants. There are
published reports to support
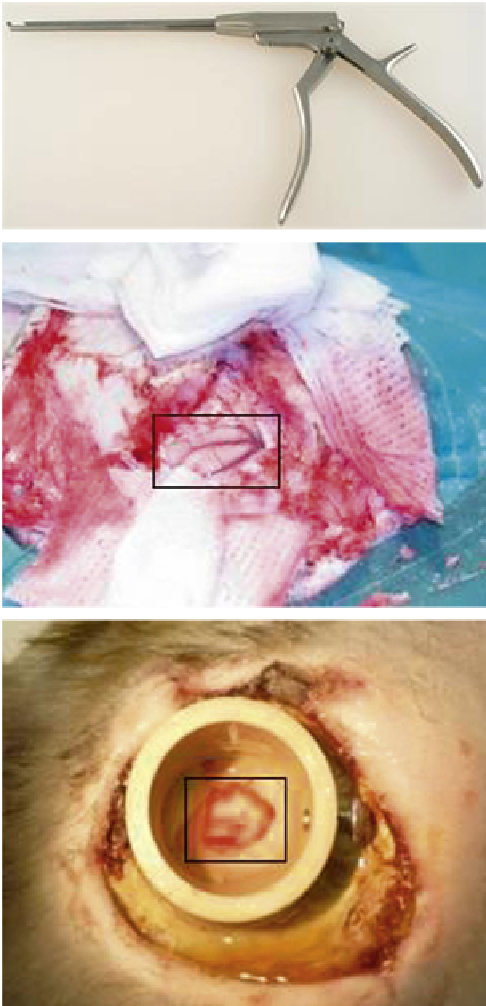
(A)
(B)
(C)
FIGURE 14.4
Bone removal process. (A) Kerrison ronguers. (B)
Rhesus monkey craniotomy (center: cortex, dura removed). (Courtesy of
S. Gografe.) (C) Cranial chronic recording chamber (center: craniotomy,
dura in place). Bone cement surrounding the chamber. Edge of the skin
e
healing in progress in a new implant.
Long Bones, Pelvis, Sternum, Digits, Vertebrae
Nonhuman primates are not commonly used in such
research. Accidental fractures, depending on their nature,
are repaired with one or a combination of intramedullary
pins, Kirschner wires, plates, screws, and casting material.
Screws are placed in the same fashion described above for
the skull. Nonhuman primate fights may result
the above observations
(
Gibbons et al., 1994
).
in