Graphics Programs Reference
In-Depth Information
36. Now let's go to Gimp and open the
bake-grass.tga
image. Once it's loaded, let's
go to
Filters → Blur → Selective Gaussian Blur
, set the Blur radius to
10
and the
Max. delta to
100
, and then click on
OK
.
37. Finally, we just need to apply a color adjustment. To do that, go to
Colors → Curves
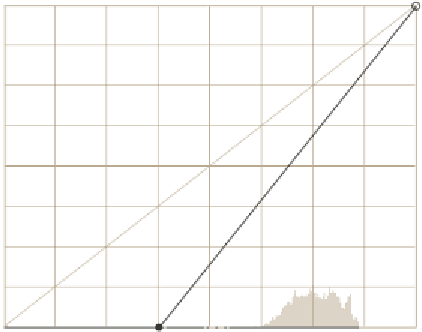
and set the curve as shown in the following screenshot:
The purpose of the curve is just to increase the contrast of the lightmap, so that
the final result will look very nice.
38. Let's now save the image and close it, but remember to keep Gimp open.
39. Having modified the baked image, we need to reload it in Blender. Let's go to
Blender, make sure the
bake-grass.tga
image is the one being shown in the
UV/Image Editor and then go to
Image → Reload
to refresh it from the hard disk.
The ingredients to set up the material are ready (the diffuse and lightmap textures),
so let's go to the
Material
tab of the Properies Editor and create the material for
the
grass
object.
40. Add a new material, name it
grass
, and set it as follows:
F
Diffuse color: 0.0 Red, 0.0 Green, 0.0 Blue (Diffuse panel)
F
Shadeless: Enabled (Shading panel)
41. Then let's go to the
Texture
tab, add a texture, and name it as
grassDiffuse
.
Then set its
Type
as
Image or Movie
and select the
grass.jpg
image from the
drop-down in the
Image
panel. Other seings are as follows:
F
Mapping panel:
Coordinates: UV
Layer: diff