Game Development Reference
In-Depth Information
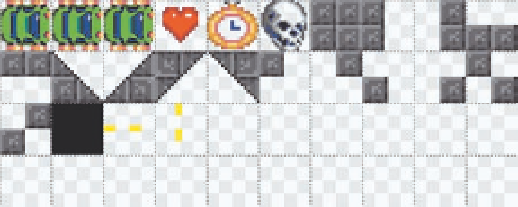
Figure 10-4.
The 320
128 tile sheet for Drive She Said
The first three tiles represent the player's car with the tires animating slightly in the forward
direction. We will code our car movement so this animation runs faster the more velocity the car
has and slower when the car slows and stops. Also, our car can go in reverse, so we will run
them backward when the car's velocity is a negative number. We will discuss this further in the
section on the basic physics for our game car.
The heart, clock, and skull sprites are next, followed by 15 various tiles for making walls. The all
black tile will be used for our drivable road, and the final two tiles represent the finish line tile in
two different directions.
Detecting collisions on the WALL tiles
The wall tiles (the 15 tiles with gray boxes and a transparent background in Figure 10-4) will be
used to mark the undrivable areas of our game world. The background tile for our game (the all
black tile) will show through this transparency. The black color is very important, not just because
it matches the road color. The color is used to depict which pixels are drivable and which are not
in the
WALL
tiles. If we simply used tile-based collision detection on the wall tiles any time one of
our look-ahead points hit any part of a
WALL
tile, our car would stop. This might be fine for the one
tile that is completely filled with gray wall, but none of the other tiles would work very well with this
type of collision detection.
So, we will use the black color around the
WALL
tiles as a collision buffer. If the car collides with
the
WALL
tile, but the color of the pixel it is colliding with is black (
0x00000000
), the collision is not
registered. The color of this buffer is selectable and can be set per level. Also, there is no reason
why the code cannot be modified to provide for many buffer colors. Since the color number is a
32-bit number, you can use transparency to create very seamless worlds. Even with our simple
black color, we have created a nice, seamless environment to drive in. You are not limited to
simply using the background color for this detection. For instance, you could paint nontransparent
pixels on the wall tiles as a buffer in any color you want and use those. You would just need to
change the color specified in the level XML or change the
Game.as
class slightly to look at more
than one color for the noncollision colors. One thing is certain though, the edge of the walls that
need to be checked for collisions cannot contain the collision pass through color or the
WALL
tiles
will not work properly.
Note that the background for our game will be on a separate layer than the foreground. By doing
this, we eliminate the need to repaint the background on each frame tick. This also negates the
collision detection between the background tile and the car look-ahead points. The actual
foreground tile color will act as our collision pass-through color in this instance. If you find you are
having trouble with collision points based on color values, set the background color of the
canvasBD
to the same color as the pass-through color if your wall tiles have transparent regions.
An alternative is to fill the transparent regions of the wall tiles with the pass-through color.