Graphics Programs Reference
In-Depth Information
Tip
You can choose a resolution for rasterized artwork in the CSS Export
Options dialog box. By default, it uses the Document Raster Effects
resolution (Effect > Document Raster Effects Settings).
3.
In the CSS Export Options dialog box, leave all settings at default and click OK.
4.
Go to the Lessson13 folder on your hard drive. In that folder, you should now see the
webdesign.css file and an image named image.png.
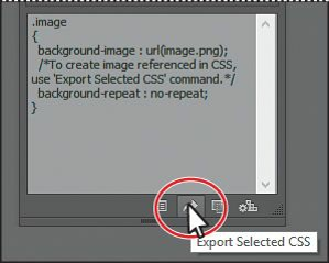
The CSS code that was generated, as was stated earlier, assumes that you are going to apply
the CSS styling to an object in your HTML editor and that the image will become a
background image for the object. With the image generated, you can use it for other parts of
your web page, as well. Next, you will export all of the CSS from the design, after setting a
few CSS options.
Note
You can also export all of the CSS from your design by choosing Export All
from the CSS Properties panel. If you want to change the export options first,
you can set them by clicking the Export Options button ( ) at the bottom of
the CSS Properties dialog box.
5.
Back in Illustrator, choose File > Export. In the Export dialog box, set the Save As
Type option to CSS (*.CSS) (Windows) or the Format option to CSS (css) (Mac OS).
Change the file name to
webdesign_all
, and make sure that you navigate to the Lessons
> Lesson13 > ForCSSExport folder. Click Export.
6.
In the CSS Export Options dialog box, leave all of the options at their default settings
and click OK.
Position and size properties are not added to the CSS code by default. In certain
situations, you will need to export CSS with those options selected. The Include