Graphics Programs Reference
In-Depth Information
6.
When the path is complete, select the Direct Selection tool and click to select an
anchor point.
When the anchor point is selected, the direction handles appear and you can readjust
the curve of the path if necessary. With a curve selected, you can also change the stroke
and fill of the curve. When you do this, the next line you draw will have the same
Painting
.”
If you want to try drawing the shape again, for more practice, scroll down to the bottom half
of the same artboard (labeled Practice) and trace the shape down there.
7.
Choose File > Save.
Converting smooth points to corner points
When creating curves, the direction handles help to determine the shape and size of the
curved segments, as you've already heard and seen. Removing the direction lines from an
anchor point can convert a smooth curve into a corner. In the next part of the lesson, you will
practice converting between smooth points and corner points.
1.
Choose 5 from the Artboard Navigation menu in the lower-left corner of the Document
window.
On the top of the artboard, you can see the path that you will trace. You will use the top
artboard as a template for the exercise, creating your paths directly on top of those. Use the
Practice section at the bottom of the artboard for additional practice on your own.
2.
In the top artboard, use the Zoom tool ( ) and click several times to zoom in.
3.
In the Control panel, make sure that the Fill color is None ( ) and the Stroke color is
black. Also, make sure the Stroke weight is still 1 pt in the Control panel.
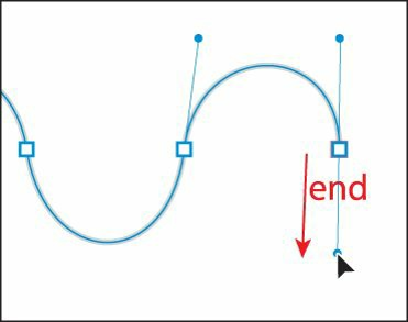
4.
Select the Pen tool ( ), and, pressing the Shift key, click the blue “start” square and
drag up to the gold dot. Release the mouse button, and then release the Shift key.