Graphics Programs Reference
In-Depth Information
The triangle in the center has a
value of 1.00. This represents
a balance point between white
and black. It is determined by
how much of the image data is
dark and how much is light.
Moving it to the right will ex-
tend the dark range and make
the image darker. Moving it to
the left will make the image
lighter. In general, you don't
want to move this too far from
the balance point. A range of
.9 to 1.1 is fairly safe.
Anything beyond that will be-
gin to look unrealistic. In
some cases, that might be your
intent.
The impact of this adjustment
can be increased by working
with color channels. The de-
fault value is RGB which in-
dicates that the full spectrum of
colors is being affected by the
changes.
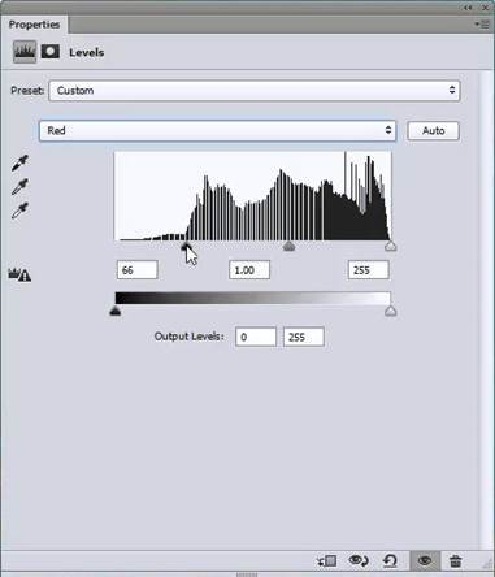
If we select Red from the drop-down menu, we get a different histogram. In this case there
is a significant tapering off of pixel data on the left side of the histogram. If we move the
slider all the way to Bar 66 as indicated in the
Levels Panel
of the last image, we will dra-
matically affect the appearance of our image.
There are three eyedropper tools on the left side of the
Levels Panel
. These can be used
to correct the
White Balance
of your image.
White Balance
can be set by establishing
Pure White, Pure Black, or Neutral Gray (18% gray). If you have something in your im-
age that fits any one of these categories, you can use the appropriate eyedropper to select
it. Photoshop will then readjust all the image data. In some cases your image will change
dramatically. This is a reversible process, so if you don't like what you see just use
Edit >
Step Backward
to return to your original image.
The eyedroppers are from top to bottom — black, gray, white.