Image Processing Reference
In-Depth Information
3.13.2 Cross-Fading Part 2—Assembling
Panoramic Images
Panoramic Photos
Images composed of several distinct shots are often called
panoramic photos. You can shoot such images freehand.
Unfortunately, panoramic photos often suffer from horizontal
or vertical mismatches, distortions, or canted sides. If you use
a tripod when shooting panoramic photos, it will be easier to
combine the images. In any event, make certain that about
one-third of each image can overlap onto the other images so
that the dissolve will appear natural and smooth. It is extremely
important to use the same focal distance and depth of focus
when taking the photos. If you don't, you'll end up with a
disjointed, odd-looking panorama made up of parts that just
don't fit together.
Depending on the model and focal depth of the lens,
your images might have distorted edges. You might have to
adapt the images with additional transformations to enable
the stitching process. Although this is a delicate venture, it is
possible with GIMP.
The pictures for the example exercise were taken with a
telephoto lens and a single-lens reflex (SLR) camera. They are
predominately free of distortions.
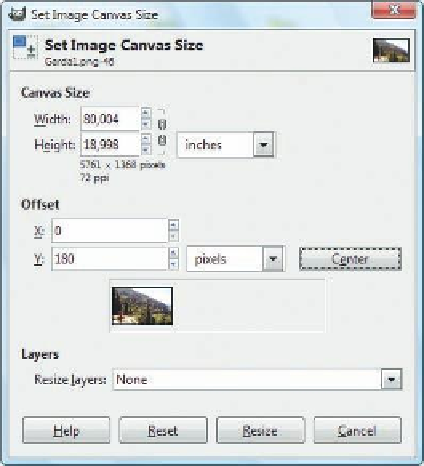
Figure 3.88
The Set Image Canvas Size window with the
recommended settings for our example
• NOTE
When combining photos into
panoramic images, prepare them
first so that they are all the same size
and, more importantly, the same
resolution. Many digital cameras
offer a panorama function as an aid
for taking such pictures.
The Procedure
• Open the
Garda1.png
image in the subfolder
Gardapanorama
in the
SampleImages
folder on the DVD.
• In the
Layers
dialog, add an alpha channel to the Background layer. This
will add transparency attributes to the layer, including the ability to
reposition the transparency or other objects. Just right-click to open the
context menu and select
Add Alpha Channel
.
• In order to stitch the images together, you must expand the image
window. Enlarge the image surface to the right. Select
Image > Canvas
Size
and enter a width of 80 in and a height of 19 in.
• Match the image to the canvas size by selecting the
View > Zoom > Fit
Image in Window
menu item.
• Position the
Garda1
layer with the
Move tool
to approximately the center
of the left edge of the canvas.
• Save the image as
gardapanorama.xcf
.


Search WWH ::

Custom Search