Graphics Programs Reference
In-Depth Information
Render to New Layer
This option renders the 3D scene and
adds the inal result to a new 2D layer
in Photoshop. This new layer is not
editable. The main diference between
the preview image and updated
image is:
•
The preview image is a locked layer
that allows you to preview the 3D
scene in Photoshop. When you
change the original model in DAZ
Studio, you can click this button to
update the preview layer.
•
The rendered image is the inal
render result from DAZ Studio.
However, it is not editable and
cannot be updated, even if you
update the original 3D scene.
Although the preview image is not the
inal rendered image and is used as
your preview of the scene changes, the
rendered image shows the inal render results, including the inal materials
and light resources.
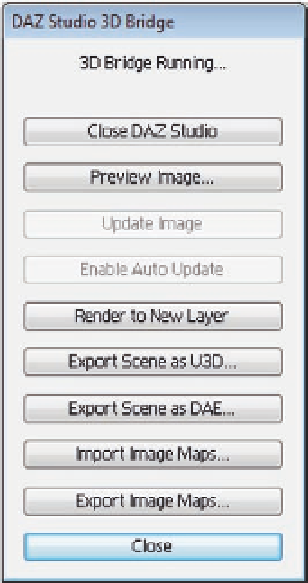
Figure 16.3
The DAZ Studio Bridge in
Photoshop.
The following steps show the diference between the preview image and the
rendered image of the 3D scene:
1. Open Photoshop and choose File
>
Automate
>
DAZ Studio 3D Bridge.
2. In DAZ Studio, make sure that the 3D Bridge option is activated from the
Edit menu.
3. Click the Preview Image button to generate a new preview layer for the
3D scene.
4. Click the Render to New Layer option to generate the inal image for the
rendered scene. DAZ Studio renders the scene and the result is placed on
a new Photoshop layer (Figure 16.4).
Export Scene as U3D
The Export Scene as U3D lets DAZ Studio export the 3D scene in the
U3D format and import it into a new Photoshop document with 3D layer
that includes the 3D scene. The advantage of using this method is that it
imports the 3D scene to Photoshop as an editable 3D layer with a simple
click. The imported 3D layer is fully editable with the Photoshop 3D tools
and 3D panel.