Game Development Reference
In-Depth Information
Target Practice
Create a new scene, save it, and name it TargetPractice, then add a directional light. Now, set up
a 3 × 3 grid of nine targets. In the Hierarchy, select Create ➤ Cube and make sure its Transform
position is (0, 0, 0). Rename it Target and set its Transform scale to (2, 2, 0.2). In the Inspector panel,
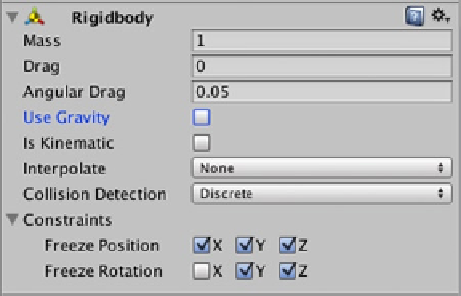
select Add Component ➤ Physics ➤ Rigidbody. In the Rigidbody component, uncheck the Use
Gravity property. Expand the Constraints property and check all three Freeze Position coordinates.
Check Y and Z coordinates for Freeze Rotation (Figure
6-5
).
Figure 6-5.
Target game object Rigidbody property settings
You can duplicate this game object by selecting it in the Scene view and pressing
+D for Duplicate.
Reposition it next to and touching the first (Transform position x of 2), then repeat to place another
Target game object on the other side of the original (Transform position x of -2) so you now have a
row of three Target game objects. While holding down the
button, click each of the Target game
objects to select the row. Again press
+D, this time duplicating the row. In the Inspector, change
the Transform position y coordinate to 2.
You may have noticed that the three Target game objects in the Hierarchy were highlighted blue
when first selected, then changed to a dark gray when you changed the Transform position y value.
Click once on this gray area to highlight it in blue again. Press
+D again to create a third row, and
set its Transform position y coordinate to 4 (Figure
6-6
).