Graphics Programs Reference
In-Depth Information
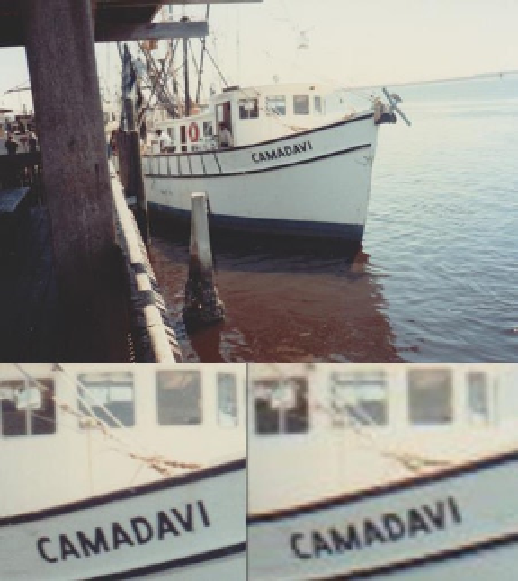
Figure 2-2.
A comparison of 300 DPI and 75 DPI scans
Generally, scanning a photograph at 300 DPI is sufficient, if the final print output size doesn't exceed
the original image size—at least, by very much. When you upscale an image, the software must
interpolate
,
or estimate, when it adds pixels to re-create the image data. Without sufficient captured image data, an
enlarged photo will look horrible when printed.
My clients often request enlargements made from small prints. These can be achieved (within reason)
by scanning the original at a higher resolution. I find that scanning a small print (such as one that is wallet
size) at 600-800 DPI will usually suffice, depending on the image quality you are starting with and how
much you want to enlarge the image (8"
×
10" is about the maximum I will attempt to coax from a wallet-size
original).
After performing the necessary edits, the file can be scaled up to the desired output size. For printing,
the image can be down-sampled to 300 DPI.
Many scanners are capable of capturing 48-bit (16 bits per channel) color. Because GIMP 2.8 currently
handles 24 bits (8 bits per channel), a 48-bit image will be converted to 24 bits when imported into the
program (a prompt window opens first). Forty-eight-bit color support will be available in GIMP 2.10. If you
have plenty of data storage space, it's a good idea to scan your images in the 48-bit mode and save the files in
a loss-less format, such as TIFF. These will serve as your
digital negatives
, preserving the maximum degree of
image integrity.
Digitizing Large Images
Most of the images you scan will be small enough to fit comfortably on a scanning bed that accommodates a
sheet 8.5"
×
11". But what if you are confronted with an old 16"
×
20" portrait? If you have large photographs
to contend with, there are options available to enable you to digitize them, in order to transfer them to your
computer, so that you can edit them.
Search WWH ::

Custom Search