HTML and CSS Reference
In-Depth Information
Creating Video Controls on the Canvas
One obvious use of the HTML5 Canvas video display functionality is to create custom
video controls to play, pause, stop, etc. You may have already noticed that when a video
is rendered on the canvas, it does not retain any of the HTML5 video controls. If you
want to create controls on the canvas, you need to make them yourself. Thankfully, we
have already learned most everything we need to do this—now we just have to put it
all together.
Creating video buttons
We are going to use some video control buttons that were created specifically for this
example.
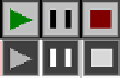
Figure 6-11
shows a tile sheet that consists of
off
and
on
states for play, pause,
and stop. The top row images are the on state; the bottom row images are the off state.
Figure 6-11. Video control button tile sheet
We don't use the off state of the stop button in this application, but we
included it in case you—the amazing reader and programmer that you
are—want to use it later.
We will load this image dynamically onto the canvas, and then place each 32×32 button
onto the canvas individually. We use the width and height to calculate which part of
the image to display as a control.
Preloading the buttons
The first thing we need to do is preload the button tile sheet. Since we are already testing
for the video to preload before we display the canvas, we need a slightly new strategy
to preload multiple objects. For this example, we will use a counter variable named
loadCount
that we will increment each time we detect that an item has loaded. In con-
junction with that variable, we will create another named
itemsToLoad
, which will hold
the number of things we are preloading. For this app that number is two: the video and
the tile sheet. These two variables are created outside of all functions at the top of our
JavaScript:
var loadCount = 0;
var itemsToLoad = 2;