Graphics Programs Reference
In-Depth Information
6
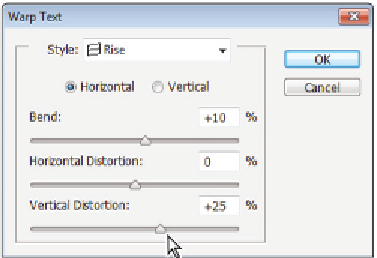
While the text is still active, click the Create warped text button ( ) in the Options
bar. The Warp Text dialog box appears. You can warp text to create all sorts of ef ects;
in this example, the text is distorted to add a little dimension.
7
In the Warp Text dialog box, select Rise from the Style drop-down menu, and make
sure that the Horizontal radio button is active.
8
Click and drag the Bend slider to the left to change the value to +10, or type
+10
into
the Bend text i eld.
9
Verify that the Horizontal Distortion is set to 0 (zero), then click and drag the Vertical
Distortion slider to the right to about the value of 25, or type
25
into the Vertical
Distortion text i eld. Click OK. The warp is applied to the text.
Applying the Rise warp.
Result.
10
Click the Commit check box ( ) on the right side of the Options bar to coni rm your
text edits. If necessary, choose the Move tool ( ) and click and drag to reposition the
text so it is visible in the upper-left corner of the image.
Adding Style to the text
Now that you have your header text created, you will add a layer style to it.
1
With the Go Fly a Kite text layer still selected, click the Add a layer style button ( )
at the bottom of the Layers panel. Select Outer Glow from the layer style drop-down
menu. The Layer Style dialog box appears with Outer Glow settings visible.
2
From the Blend Mode drop-down menu, choose Normal.
3
In the Structure section, click once on the Set color of glow swatch; the Color Picker
appears. Click and drag the slider, on the right of the color pane, until you see blue
colors in the color pane. Choose a navy blue and click OK.


