Graphics Programs Reference
In-Depth Information
3
Select the Pen tool
(
)
from the Tools panel.
4
Position the cursor over the image, and notice that an asterisk appears in the lower-
right corner of the tool. This signii es that you are beginning a new path.
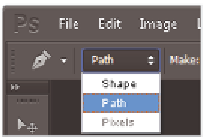
5
When the Pen tool is selected, the Options bar displays three path buttons: Shape
layers, Paths, and Fill pixels. Click the second menu item for Paths.
Select Paths in the Pen tool options.
6
Increase the zoom level by pressing the Ctrl+plus sign (Windows) or Command+plus
sign (Mac OS), so that you can view the exercise i le in the image window as large as
possible. If you zoom too far in, zoom out by pressing Ctrl+minus sign (Windows) or
Command+minus sign (Mac OS).
7
Place the pen tip at the i rst box in Example A, and click once to create the i rst
anchor point of the path. Don't worry if it's not exactly on the corner, as you can
adjust the path later.
8
Place the pen tip at the second box on Example A and click once. Another anchor
point is created, with a line connecting the i rst anchor point to the second.
9
Continue clicking on each box in the exercise until you reach the last box on the path.
If you're having dii culties seeing the line segments between the points on your path,
you can temporarily hide the Exercise layer by clicking on the Visibility icon next to
that layer.
10
Hold down the Ctrl (Windows) or Command (Mac OS) key, and click on the white
background to deactivate the path that was just drawn to prepare for the next path.
In Example A, only straight line segments were used to draw a path; now you'll use
curved line segments.
11
Reposition the document in the window so that Example B is visible.