Information Technology Reference
In-Depth Information
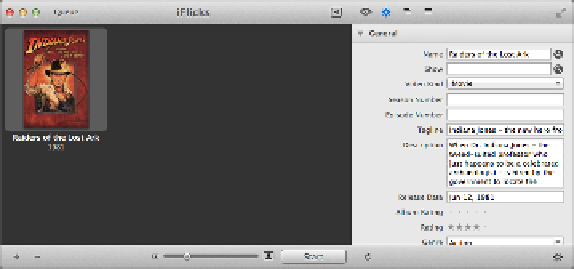
Figure 50:
iFlicks shows what it's going to add to your video be-
fore you click the Start button. It's magic.
Don'tworryifthecoverartormetadataiswrong—atthispoint,iFlickshaswrit-
ten nothing to the file.
2. Click the eye, found in the toolbar next to the gear.
3. In the Preset pop-up menu, the default is iTunes Compatible. iFlicks not only
addsmetadata,italsoconvertsvideo!Butwe'vealreadydonethat,sowewantto
turn that off. Choose Update Metadata and Rename instead.
Still in the “eye” view, select the Add to iTunes box to let iFlicks save you the
trouble of adding the file to iTunes manually. (Naturally, the box is dimmed out
if it's already in iTunes.)
4. When you're happy with your settings, click Start at the bottom.
Your files will be processed in seconds!
Convert for Apple TV
Let's say you have movies or TV shows that you didn't rip the way I specified. Maybe you
downloaded them, or they fell off the back of a truck. Hey, I'm not judging! iFlicks can help
you convert those for the Apple TV as well.
You might say, “Oh no, not yet another lengthy conversion.” Well, you might be pleasantly
surprised to find that for many video files, iFlicks can simply rejigger the movie's
container
without affecting the actual video. This seems to be especially true with MKV video files,
which are often Apple TV-compatible videos that have been wrapped in an anti-social shell.
To convert video, look up the metadata in iFlicks if necessary (as described just previously),
then click the eye icon in the toolbar. Under Preset, choose iTunes Compatible (
Figure 51
).
This preset does as little conversion as possible to get it working on the Apple TV—saving