Graphics Programs Reference
In-Depth Information
Adjusting perspective in an image
The Perspective Warp feature lets you adjust the way objects in your image relate
to the scene. You can correct distortions, change the angle from which an ob-
ject appears to be viewed, or shift the perspective of an object so that it merges
smoothly with a new background.
Using the Perspective Warp feature is a two-step process: defining the planes and
adjusting them. You start in Layout mode, drawing
quads
to define two or more
planes; it's a good idea to align the edges of the quads so that they are parallel with
the lines of the original object. Then you switch to Warp mode, and manipulate the
planes you defined.
You'll use Perspective Warp to merge images with different perspectives.
1.
Choose File > Browse In Bridge.
2.
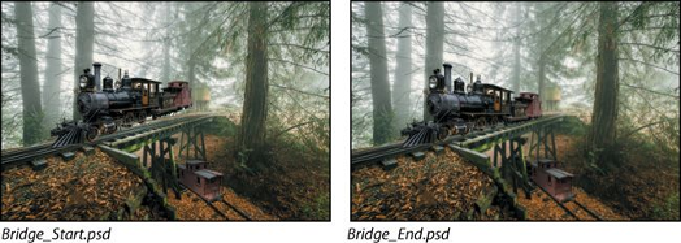
Navigate to the Lesson05 folder, if you're not there already, and then look
at the Bridge_Start.psd and Bridge_End.psd thumbnail previews.
In the Bridge_Start.psd file, the image of the train has been combined with the im-
age of a trestle bridge, but their perspectives don't match. If you're illustrating a
story about a flying train that is making a landing on a trestle bridge, this might be
perfect. But if you want a more realistic image, you'll need to adjust the perspect-
ive of the train to put it firmly on the tracks. You'll use Perspective Warp to do just
that.
3.
Double-click the Bridge_Start.psd file to open it in Photoshop.
4.
Choose File > Save As, and rename the file
Bridge_Working.psd
. Click
OK in the Photoshop Format Options dialog box.
5.
Select the Train layer.