Hardware Reference
In-Depth Information
Engage thrusters
You will need all of the tools listed in the previous secion to get through this project. Take
your ime and make sure you have everything handy!
Objective complete - mini debriefing
Do you have all the tools? Ready to go? Then on to the next task!
Setting up the GPIO
We need to enable the GPIO peripherals in our Raspbian installaion to get started. In order
to download the required tools and set things in moion, the Raspberry Pi needs to be
connected to the Internet.
The GPIO pin is a pin that is available from the Raspberry Pi's processor that enables
interfacing input and output devices to the Raspberry Pi. In this secion, we will talk about
seing up the GPIO for interfacing an output device. There is a 26-pin interface (40 in Model
B+) available on the Raspberry Pi and about 17 of those 26 pins are GPIO pins (26 of them
in Model B+) while the others are miscellaneous pins such as power. The pins are driven
by a 3.3 V rail and each GPIO pin is rated for about 17 mA and the total current draw not
exceeding 50 mA.
Engage thrusters
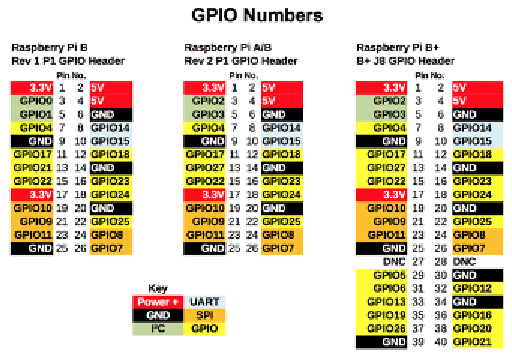
We also need to know the GPIO peripherals available to conduct our experiment. The
following figure shows the GPIO maps of the Raspberry Pi
Rev 1
and
Rev 2
:
GPIO map for Models A, B, and B+. (Image published with permission from Raspi.tv)