Graphics Programs Reference
In-Depth Information
You can change the elevation in the midst of modeling a run by changing
the Offset value in the drop-down and then continuing the run. Revit
automatically inserts the proper fittings and vertical conduit to transition
to the new elevation. The Offset Connections panel, shown in
Figure 13.41
,
allows you to connect conduits at different elevations either by using a
vertical riser conduit or by applying a slope to connect directly. When you
start drawing conduit at an elevation, you can apply either of these settings
and connect to conduit at a different elevation. The run of conduit is
modeled directly to the point of connection, with a vertical riser or whatever
slope is required to make the connection.
Figure13.41
Conduit placement options
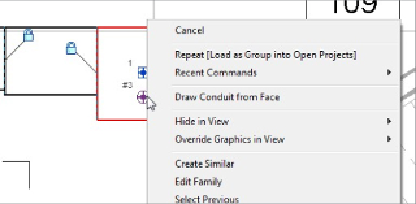
To connect conduit to equipment or a device, the object must have a conduit
connector. When you select the object, you can right-click the conduit
connector grip and choose the option to draw conduit from the connector,
as shown in
Figure 13.42
.
This connector is defined as a
face connector
,
which means that conduit can be connected anywhere on the face of the
equipment. It also means that multiple conduits can be connected to the
face.
Figure 13.42
Drawing conduit from a connector
Selecting this type of connector allows you to choose the position of the
connection prior to drawing the conduit. The connection point can be
dragged to any location on the face, or you can edit the temporary
dimensions to locate the connection point. Once you have determined the