Graphics Programs Reference
In-Depth Information
Lighting Analysis
Because you are placing light fixtures for the purpose of a layout that is
coordinated with other disciplines, you can also get design information that
will help you make decisions on the types of lights to use. You can use the
power of the scheduling capabilities of Revit MEP to create a schedule of the
spaces in your model that shows the lighting fixtures used and the lighting
criteria in which you are interested. You can review this schedule as you
place lights into the model to see whether you are making the right choices
for lighting fixtures.
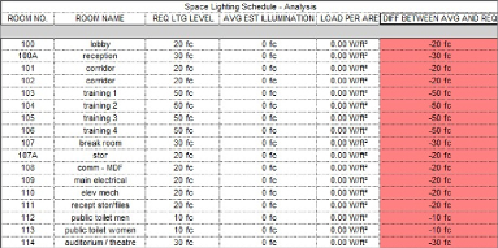
Figure 12.4
shows a simple version of this type of schedule. The last column
is a calculated value that shows the difference between the required lighting
level and the actual level. A difference greater than 5 foot-candles causes
the cell to turn red. Because there are no lights in the model yet, none of
the spaces has the required lighting level, so every cell in the column is red.
Your goal as a designer is to achieve a schedule with no red cells in the final
column.
Figure 12.4
Sample lighting analysis schedule
Prior to using this schedule, you should assign a target lighting level for all
the spaces that you will analyze. Create a project parameter to be used for
your targeted lighting level. This should be an instance parameter so that it
canvaryfromspacetospace.SetthedisciplineoftheparametertoElectrical
and the type to Illuminance. Group the parameter in the Electrical-Lighting
group so that it can be easily located. Give the parameter a name such as
Required Lighting Level
so that the intended use of the parameter is
clear. You can create this project parameter in your project template file
for use on every project if desired. Remember that you can use project