Graphics Programs Reference
In-Depth Information
Placing Spaces
Revit allows you to locate spaces within your model in two ways: by placing
spaces manually or letting Revit locate boundaries and place spaces
automatically. If your building has many rooms, allowing the program to
place the spaces automatically for you can save time.
When using automatic placement, be sure that all the spaces created are
the actual spaces that you intend to model. Check that areas such as utility
chases, furrowed columns, and air spaces in wall constructions were not
included when spaces were placed. To remove any unwanted spaces from
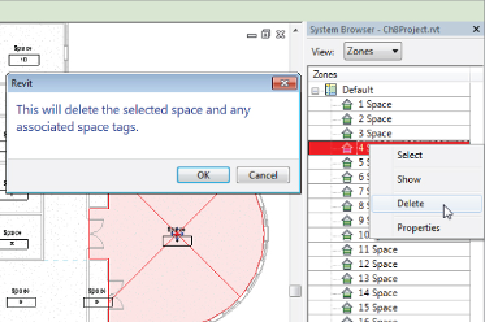
the project file, open the System Browser, which is located on the View tab
under User Interface (or you can press F9), and set the view to Zones by
choosing Zones from the View drop-down menu at the top of the dialog box.
Select the desired spaces to remove by highlighting the space name,
right-clicking, and selecting Delete, as shown in
Figure 8.3
.
Click OK in
the pop-up window to remove the spaces and any associated space tags
permanently.
Figure 8.3
Deleting unwanted spaces from the project file
If you were just to select a space within an open view and delete it without
using the System Browser, the space and its associated tag would be deleted
fromthemodel,butthespacewouldstillbepresentinyourproject.Thishas
an effect on any building analysis performed as well as any HVAC systems
that will be set up in the building. Systems are covered in depth in Chapter