Game Development Reference
In-Depth Information
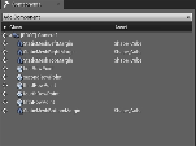
Open the component graph and start adding these components:
•
Camera
: This will be the component that renders the game. As you can see in the
preceding screenshot, I added one component and left its name as
Camera1
. It
was set as
ROOT
of the blueprint; it holds all the other components as children
underneath its hierarchy.
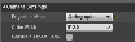
◦
Changed Values
: The only value you need to change in the camera com-
ponent is
Projection Mode
. You need to set it to
Orthographic
, as it will
be rendered as a 2D game, and keep
Ortho Width
as
512
, as it will make
the screen show all the content in a good size. Feel free to use different
values based on the content of your level design.
Note
Orthographic cameras work without depth, and they are recommended more in
2D games. On the other hand, the perspective camera has more depth, and it is
better to be used with any games with 3D content.
•
Static Mesh
: To be able to add meshes as boundaries or triggering areas to col-
lide with the ball, you will need to add cubes to work as collision walls, perhaps
hidden walls. The best way to add this is by adding four static meshes and align-
ing and moving them to build them as a scene stage. Renaming all of them is also
a good way to go. To be able to distinguish between them, you can name them as
I named them:
StaticMeshLeftMargin
,
StaticMeshRightMargin
,
Stat-
icMeshTopMargin
, and
StaticMeshBottomMargin
. The first three are the left,
Search WWH ::

Custom Search