Game Development Reference
In-Depth Information
The previous example (like everything else here) is included in the
sample project with the code download that accompanies this topic.
Unfortunately, with this UI pack, you'll run into one of the slightly annoying features
of the 2D sprite editor; most 2D spritesheets use the top-left for position
0,0
when
configuring individual sprites. However, Unity's sprite editor uses the bottom left for
position
0,0
.
Bear this in mind, when you use spritesheet configuration files (usually packaged with
the spritesheet) to determine the configuration of the sprite position and size. The
X
,
width, and height will usually be fine, however, the
Y
value will need some love. Just
take the spritesheet height and take away the sprite's expected value and then take
away the sprite's height to get the
Y
position for Unity. For example, the spritesheet
height is
210
, the buttons generally have a height of
45
, so a
Y
position of
39
in the
spritesheet configuration would translate to the
Y
position
126
in Unity. (It's just
inverted). The UI pack above has one of these spritesheet configuration files packaged
with it. Armed with the previous infomation you should import the three spritesheets
and attempt to set them or use the example in the code download as a template.
If you are unfamiliar with the Sprite Editor, then I suggest watching
Unity's own tutorial video on the subject at
http://bit.ly/
Unity2DSpriteEditor
or picking up a nice 2D topic (self-promotion
mode enabled), I hear mine has been very popular —
Mastering Unity
2D Game Development
,
Packt Publishing
.
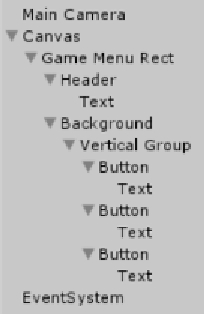
WIth the UI Pack spritesheets imported (Blue, Yellow and Grey), building this
example menu is very simple with the following hierarchy: