Graphics Programs Reference
In-Depth Information
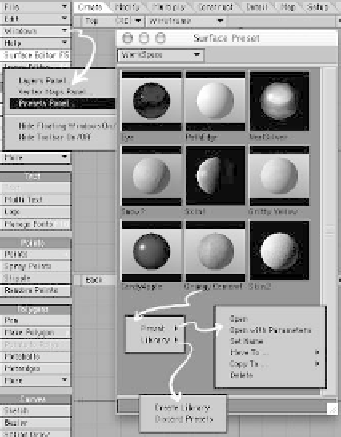
Figure 3-52: The Surface Preset window.
Figure 3-51
You can right-click on a surface's name and
copy and paste all of those surface's attrib-
utes to another surface. Using the buttons
at the top of the Surface Editor, you can
load, save, and rename a surface you may
find a use for later.
Another way to get quick access to your
favorite surfaces is through the Surface
Preset window. This window gives you
quick, visual access to a whole slew of stock
settings provided by NewTek that range
from Rocks to Raw Umber and just about
everything in between. The presets are
separated into different libraries, selectable
through the pop-up menu at the top of the
window (showing the WorkSpace library in
Figure 3-52).
Double-clicking on a preset will load
that preset's settings onto the currently
selected surface in the Surface Editor.
Right-clicking on a preset will open a
menu tree where you can rename the pre-
set, delete it, move it to another library, or
create and manage libraries of your own.
Note
As you're exploring surfacing settings, just
playing around and having fun, you're
bound to come across some cool combina-
tions that you may find a use for later.
Remember the old saying, “The palest ink
is better than the strongest memory.”
If you stumble across something that looks
even remotely neat, save those settings in a
directory for later use. Surface setting files
are small, disk space is cheap, and you
never know when something will come up
where you will find a use for “Gritty Yellow”
or “Grungy Cement.”