Graphics Programs Reference
In-Depth Information
•
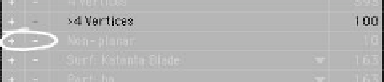
Surf: Katana Blade
— Since I have
the Katana Blade surface selected in this
pop-up menu, it being highlighted tells me
that my selection contains at least one poly
with that surface.
•
Part: ha
— My selection also contains
at least one poly from the part of the sword
I have grouped and named “ha.”
Figure 3-12: The Polygon Statistics window.
Figure 3-13: Detail from the Statistics window.
When you have geometry selected, the cat-
egories into which items in your selection
fall are shown in light gray text. For Figure
3-12, I have selected four polygons some-
where on the sword. The Polygon Statistics
window tells me the following about the
polygons I have selected (from top to bot-
tom, only listing the
highlighted
headings
that polygons in my selection fall under).
The numbers on the right-hand side don't
change; they reflect the totals for each category.
•
Total
— Total is highlighted because
the polys I have selected are part of the
total polygon count (kind of a no-brainer).
•
Faces
— My Katana object consists of
only faces, so the fact that the Statistics
window shows my selection to contain
faces isn't surprising either.
•
4 Vertices
— Of the different possible
numbers of vertices polys can have, my
selection falls only under the category of
polys with four vertices. (The 4 Vertices
category is the only vertex-number cate-
gory that is highlighted.)
•
Non-planar
— My selection of four
polygons contains at least one of the ten
non-planar polys.
The Statistics window does more than just
show you information. You can use it to add
and remove points and polys from your
selection. Clicking on the
+
or
-
in the
columns at the window's left
adds
or
sub-
tracts
all the polys from that category,
respectively.
Using this, I could triple all the non-pla-
nar polygons I've got in the Katana, turning
them into triangles so they render without
the worry of them flickering during an ani-
mation. To do this:
1.
I would first make doubly sure that I've
got nothing else selected, so I know
I'm
only
tripling the non-planars.
(Check the Quick-Info display in the
lower-left corner of Modeler, and click
in the reset area or press <
/
>todrop
any polys I might have selected; see
Chapter 2.)
2.
Click on the “
+
” in the Polygon Statis-
tics window's
Non-planar
line. (This
adds
all ten non-planar polys that this
object has to my selection.)
3.
Press <
T
> to triple the selected
polygons.