Graphics Programs Reference
In-Depth Information
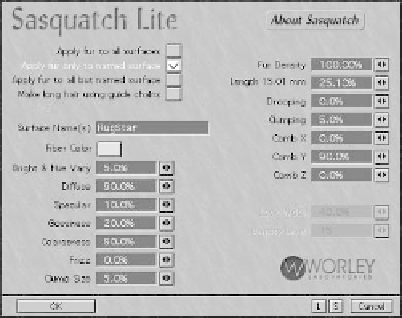
Frizz is low, because I want the fibers
to be straight. Clump Size is low,
because I want the rug to look fairly
new.
15. Fur Density is fairly high, because I
don't want to see “holes” in the fibers
of the new rug. Length is around
15 mm, because I'm making the rug
“real size” and that's the length of the
fibers on the rug I have here. Drooping
and Clumping are very low, because of
the “new” look I'm going for. Finally,
I've set Comb Y to
90%
so the fibers
will stand up tall.
Figure 20-18: SasLite applied to a surface.
18. Tap <
Ctrl
>+<
F8
> (or go to
Win-
dow | Image Processing…
) and
open the Processing tab of the Effects
window. Click on
Add Pixel Filter
, and
choose
SasLite
from the list, as you
did before. Make the fibers self-shad-
owing, so you can see them in the test
renders. You know how to do that.
19. Tap <
F9
> (or go to
Render | Render
Frame
) to see what you have. (It may
take several moments to apply SasLite,
depending on the speed of your com-
puter.) If you like the results, then
move on to the next step. If you don't,
then feel free to tweak the settings
until you do.
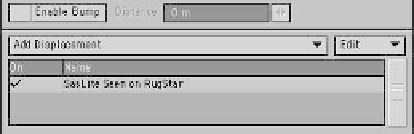
20. Once you're happy with the fibers, you
need to assign the same settings
(except for color) to the other two
materials. To do that, just click the
SasLite Seen on RugStar
line with
the RMB (right mouse button) and
choose
Copy
from the drop-down
menu that appears. Click again, and
choose
Paste
to create another
instance with the same settings.
Paste
again, so you have three instances.
(See Figure 20-20.)
21. Then simply click on each setting to
open it, type in the name of the surface,
and choose a new color. The rest of the
settings can remain the same. When
you're finished, you should have three
instances, each showing a different sur-
face (Figure 20-21).
Note
The Comb values are relative to the model
orientation in Modeler, not the way it's sit-
ting in Layout, so the fibers will grow away
from the polys, even though we've rotated
the rug.
16. You can match the numbers shown in
Figure 20-17, or you can choose your
own, of course.
Figure 20-17: The settings used for the rug pictured.
17. When you're finished, click
OK
.You
should see “SasLite Seen on RugStar”
in the Add Displacement area of the
Object Properties panel.