Graphics Programs Reference
In-Depth Information
3.
You can increase the quality of your
rendered voxel by
increasing
the num-
ber of slices (found on the Shading |
Basic tab). Comparing Figure 18-30
with Figure 18-29, there is a marked
increase in detail, and the render time
is still light-years away from the
lengthy render we would have were we
to set our Object Type to Volume.
Noise Type to
Gradient Noise
(just a
different kind of “fractal engine” pow-
ering our Dented procedural texture).
Set Texture Amplitude to
150%
,Tex-
ture Effect to
Turbulence
, and Effect
Speed to
50%
.
(
Double-check
your settings against the
above text and Figure 18-31. If your set-
tings don't match mine, your render won't
either.)
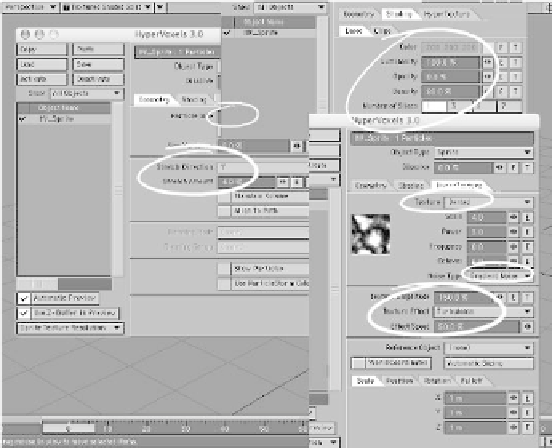
4.
Now, let's do something really cool.
Under the Geometry tab, set the Parti-
cle Size to
20 m
, the Stretch Direction
to
Y
, and the Stretch Amount to
4%
(this will “squish” our voxel down to
4% of its natural spherical shape along
the Y axis). You may as well deactivate
Show Particles
, since the effect we're
creating isn't “captured” by the Show
Particles engine. Under the Shading |
Basic tab, set Color to
200
,
200
,
200
,
Luminosity to
100%
, Opacity to
0%
,
Density to
80%
, and Number of Slices
to
1
. Then, under the HyperTexture
tab, set Texture to
Dented
(
double-
check
that Scale is
4
, Power is
3
,Fre-
quency is
0.8
, and Octaves is
6
). Set
Figure 18-32
A render shows something that looks
like high-altitude clouds. What we've done
is
quickly
fake volumetric ground fog (the
misty, wispy stuff that
hovers in quiet hollows
on nights when the moon
is full). You can move
through
this ground fog,
and you can set the fog's
exact
position above the
ground by positioning the
null. It won't “catch”
shadows very well, but if
you ever try “real” volu-
metric ground fog, you'll
appreciate the
time-in-render-land this
hack provides.
Figure 18-31