Graphics Programs Reference
In-Depth Information
Setting the chain's goal object is just the
first step in setting up IK. The chain will be
pulled toward the goal, but only when the
parent items in the chain are told that they
can use IK to solve for their rotations.
1.
Select
Bone (1)
.
2.
Click on the
Controllers and Limits
tab in the Motion Options window.
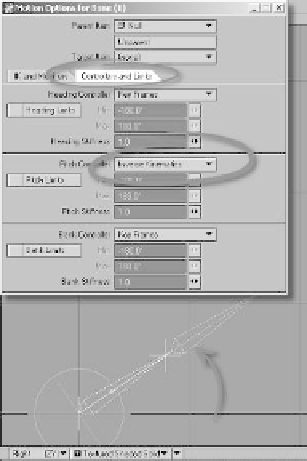
3.
Choose
Inverse Kinematics
for its
Pitch Controller. The moment you do
this, LightWave begins using IK to
solve for the pitch axis for that item,
and the bone swings upward, bringing
the base of the puller item as close as it
can get to the goal item.
Figure 16-12
Note
Figure 16-13
If you recall our discussion of rotation in Chapter 1, the best way to remember LightWave's con-
ventions for its axes of rotation is to think of your hand like an airplane.
Heading
changes where
the “plane” is heading (represented by a red circle in Layout).
Pitch
changes its altitude (green).
And
bank
would be the amount of “roll” (blue).
Well, there you have it — a quick and easy
explanation of standard IK and how to set it
up. (That wasn't so painful, was it?) The
same basic principles you've seen here also
hold true as you add more parts to the
chain, but keep in mind that as you do so,
the math required of the IK solver grows
ever more complicated for the computer.
That can lead to a number of problems.
If you want your IK system to behave
predictably in complex situations, you need
to help the IK solver as much as possible.
This means putting some restrictions on
what you ask IK to do.