Graphics Programs Reference
In-Depth Information
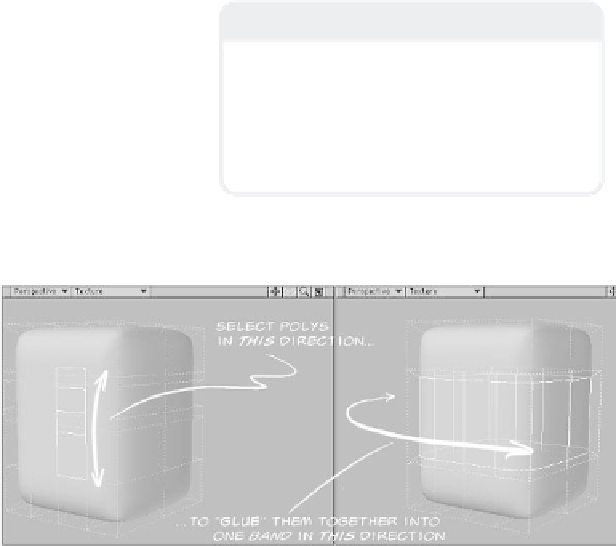
markers in the white area of the interface,
which represents the top and bottom of the
band of polys that will be selected/cut.
Note
A good way to determine the path that
BandSaw will take as it cuts through your
polys is to use the Select Loop tool (dis-
cussed in Chapter 3) first.
•
Add
puts more of these band markers
wherever you click your mouse in the
white area.
•
Edit
lets you click and drag the band
markers.
•
Delete
removes any band marker you
click on.
•
Value
lets you enter a specific position
(0 to 1) along the white area for the
selected band marker.
•
Uniform
repositions the band markers
you have, spreading them all out evenly.
•
Mirror
creates a new band marker that
mirrors your currently selected one.
•
Reverse
flip-flops the band markers.
•
Clear
removes all but one of the band
markers, placed exactly in the center.
Figure 7-7
to use its interface window. It “remembers”
the last settings you used with it and
applies them immediately when activating
the tool. (I've mapped this tool to a hot key
and assigned it to my Quick-Tools menu
tab, so when I want to select a band of my
mesh, I just tap its hot key and keep right
on working!)
Note
The Preset pop-up menu in the BandSaw Pro
Numeric window will remember the settings
in ten different presets. Just choose one, do
your thing, and the next time you choose
that preset, your previous settings will be
ready and waiting for you!
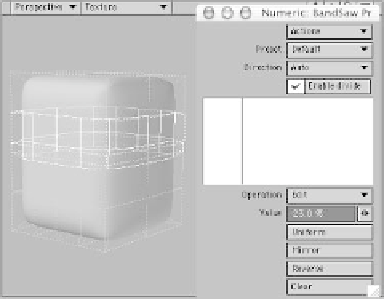
Multiply | Subdivide | More | Band-
Saw Pro
does the same thing as BandSaw
but with a real-time Numeric window inter-
face that lets you
still interact with
your viewports
while open. The
cool upshot of this,
other than being
able to orbit your
model to see if the
segmenting is
working as you'd
like, is that it
doesn't require
you
Figure 7-8