Graphics Programs Reference
In-Depth Information
•
The
Alpha
is set to 100%, so the color
is opaque.
•
The
Parameter
is 0, saying that we're
looking at the point where the Bump chan-
nel is at its lowest. (The starting parameter
is usually “locked” in place, though you can
change the parameter for all the other
keys.)
The other buttons below the input fields let
you modify the values in real time.
•
Smoothing
is a pop-up menu that lets
you choose how you want the values to be
interpolated.
•
Scale Keys
is a drag button that lets
you compress or expand all the keys in real
time.
•
Shift Keys
is a drag button that moves
the keys (except for Start) in real time.
•
Scale Values
leaves the keys right
where they are and lets you compress or
expand the values on the keys.
•
Shift Values
also leaves the keys
where they are, adding values to or remov-
ing values from the keys.
•
Invert Keys
is a quick way for you to
flip-flop the keys.
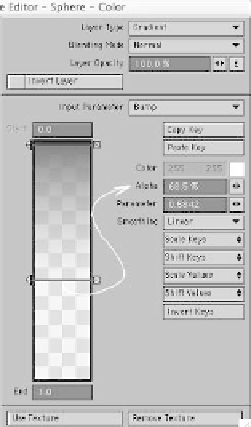
Starting with the
Input Parameter
field,
we see that wherever the Bump channel is
about midway from its lowest to its highest,
these settings are in effect.
•
The
Color
to be applied is 255, 255,
255 (white).
•
But the
Alpha
is only 68.5%, so this
color will be only 68.5% opaque (or 31.5%
transparent, however you'd prefer to look at
it). The “checkerboard” pattern is there to
show that you are “seeing through” the
color because the alpha's setting is making
it transparent.
Figure 4-49: Clicking somewhere in the middle of
the bottom key's bar makes the input fields reflect
its attributes. (Clicking on the little “x” box will
delete the key.)
That's it for the coloring! Using only refer-
ences to how high or low the Bump channel
is, the Gradient texture is able to give us
more detail than if we had a huge, painted
texture to provide the coloring for our
surface.
Note
If you want to
move
one of those bars on the
gradient, just click and drag. If you want to
add
one, just click in an “empty” area of the
gradient's span. If you want to
remove
one,
just click in the little “x” box on the bar's
right side.
Layer Opacity lets you tell LightWave how
much of the layer's effect you want figured
into the surface's overall look. You can use
Invert Layer to keep all your settings as is
and yet reverse the effect of your layer (in
this case, what was dark would be light and
vice versa).
Check out the LW manual for ways to use
the different Input Parameter settings and
ways of layering textures using Blending
Mode to, among other things, let one layer
serve to
displace
or be used as an
alpha
for
another layer.