Java Reference
In-Depth Information
1.47
Identify and fix the errors in the following code:
1
public class
Welcome {
2
public void
Main(String[] args) {
3 System.out.println('Welcome to Java!);
4 }
5 }
You can edit, compile, run, and debug Java Programs using NetBeans.
Key
Point
NetBeans and Eclipse are two free popular integrated development environments for devel-
oping Java programs. They are easy to learn if you follow simple instructions. We recom-
mend that you use either one for developing Java programs. This section gives the essential
instructions to guide new users to create a project, create a class, compile, and run a class in
NetBeans. The use of Eclipse will be introduced in the next section. For instructions on down-
loading and installing latest version of NetBeans, see Supplement II.B.
VideoNote
NetBeans brief tutorial
1.11.1 Creating a Java Project
Before you can create Java programs, you need to first create a project. A project is like a
folder to hold Java programs and all supporting files. You need to create a project only once.
Here are the steps to create a Java project:
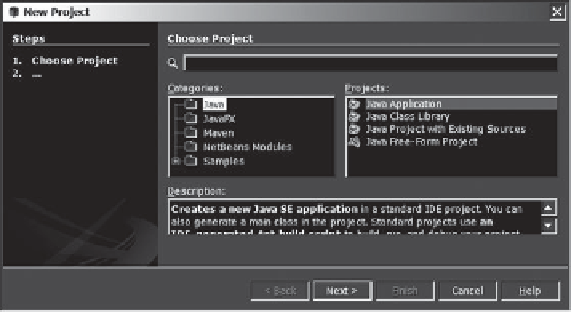
1. Choose
File
,
New Project
to display the New Project dialog box, as shown in Figure 1.12.
2. Select Java in the Categories section and Java Application in the Projects section and
click
Next
to display the New Java Application dialog box, as shown in Figure 1.13.
3.
Type
demo
in the Project Name field and
c:\michael
in Project Location field. Uncheck
Use Dedicated Folder for Storing Libraries
and uncheck
Create Main Class
.
4.
Click
Finish
to create the project, as shown in Figure 1.14.
1.11.2 Creating a Java Class
After a project is created, you can create Java programs in the project using the following
steps:
1. Right-click the demo node in the project pane to display a context menu. Choose
New
,
Java Class
to display the New Java Class dialog box, as shown in Figure 1.15.
F
IGURE
1.12
The New Project dialog is used to create a new project and specify a project type.


Search WWH ::

Custom Search