Graphics Reference
In-Depth Information
Removing a material
While assigning materials, it is natural that at a certain point, we will make a mistake
and select the wrong material. If our goal is just to change the material, the most
logical way to correct this mistake is by selecting another material. What if we assign
a material to a surface, but in reality we want to use the imported material?
Once again, to work with the imported 3D models, we need to click on the
Import
menu and click on the Edit Materials button. However, there is a slight difference
between the first time we were starting to add materials and now that some materials
are assigned to the 3D model. The difference is that now when we place the mouse
over the 3D model, Lumion doesn't highlight the entire 3D model as before. Instead,
Lumion highlights the materials we have assigned to a 3D model and when we click
with the left mouse button, Lumion directly opens the material, as shown in the
following screenshot:
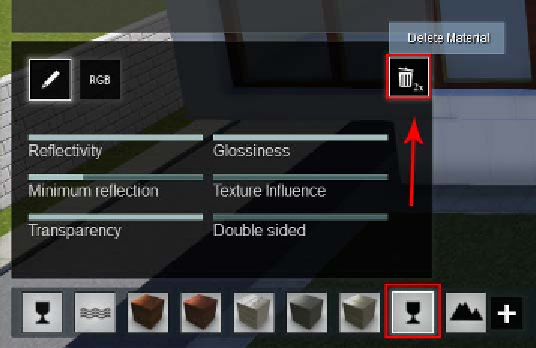
As shown in the previous screenshot, it is on the material properties that we can find
the Delete Material button, and we have to click twice to delete the material.
Now that we know the basics of working with Lumion's materials, it is a good idea
to expand our knowledge of what is available to change and tweak the materials.
These next sections will be purely technical, but the understanding of the concepts
mentioned can make a difference between a beautiful render and an OK render.