Graphics Reference
In-Depth Information
Working with height maps can slow down Lumion's performance, particularly when
we are working with big areas. How can we improve Lumion's performance? How
can we optimize our scene to cope with the content presented? Let's see the answer
to these and other questions.
Workflow optimization (best practices)
There are a few things that we can do in order to improve the way Lumion works.
This is something directly connected to the workstation we have or, in other words,
if our workstation or system is powerful enough, perhaps we will never feel the need
to follow some of the suggestions mentioned here.
Configuring Editor Quality
Editor Quality
is something we mentioned briefly in
Chapter 1
,
Getting Ready for
Lumion 3D
. So, if you had the opportunity to read the
Quick overview
section, you
may want to jump to the next section called
Using Lumion's layers
.
To configure the quality we see while working on the
Build
,
Photo
, and
Movie
mode, we need to open the
Settings
menu. As mentioned in this chapter, the Settings
button is found on the right-hand side. When we click on the button, the
Settings
menu appears, and for this section, we will focus our attention on just a few settings,
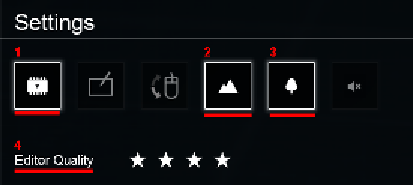
as shown in the following screenshot:
Remember that we can use our own textures inside Lumion and that they are
imported with the 3D model, but the size of the texture influences the time Lumion
takes to render the image. The buttons of
Settings
are as follows:
• The first button (
1
) limits all texture sizes to 512 x 512 pixels and saves a bit of
memory for huge scenes or low-end graphics cards.
• The second button (
2
), in the previous screenshot, was already covered in
this chapter, but let's revisit it. When we click on this button, we will improve
Lumion's speed by removing or adding levels of detail to the terrain. The
shortcut for this setting is
F7
.