Graphics Programs Reference
In-Depth Information
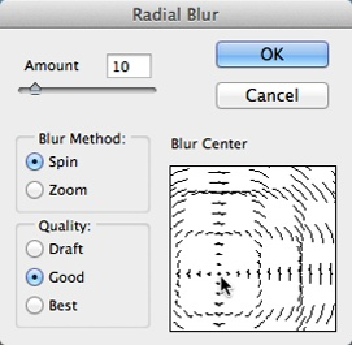
choice between Draft, Good, and Best quality for the final results. You can choose Draft and
then click OK for a quick look at roughly what you'll get. Then undo it and choose Good for
the final version. (Good and Best aren't very different except on large images, so don't feel
you have to choose Best for the final version. However, with a reasonably up-to-date com-
puter, you don't need to bother with Draft because your machine can whip up a final version
a lot faster than computers could when this filter was first created.)
After choosing a blur method (Zoom or Spin), adjust the Amount slider, which controls how
intense the blur will be. Next, click in the Blur Center box to tell Elements where you want
the blur centered, as shown in
Figure 13-11
.
Click OK when you're finished, and Elements
blurs your image.
Figure 13-11. The Blur Center box lets you pick a center point for the Radial Blur filter's effect.
Drag the ripple drawing inside the box in any direction. Here, the center point was moved just to
the left and down from its original position in the center of the box.
Color Correcting with the Average Blur Filter
If you've already given the Average Blur filter a whirl, you may be wondering what on earth
the folks at Adobe were thinking when they created it. If you use it on a whole photo, the im-
age disappears under a monochromatic soup, something like what you'd get by pureeing all
the colors in the photo together.