Graphics Programs Reference
In-Depth Information
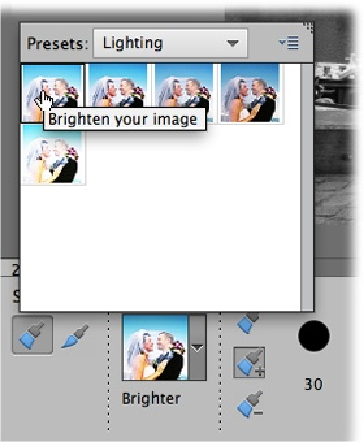
Figure 7-3. The things you can do with the Smart Brush are grouped into the categories lis-
ted in this drop-down menu. Select different categories to see different presets. Each thumb-
nail image shows that option applied to a photo. For exposure issues, start by looking at the
Lighting category (choose Lighting from the drop-down menu at the top of the panel). You
can choose to make the area you're about to paint darker or brighter, increase or decrease
its contrast, or add a spotlight effect to it. Just put your cursor over each thumbnail to find
the effect you want, and then click it to select it.
3.
Drag over the area you want to change
.
This step is just like using the Quick Selection tool (
Selecting with a Brush
)
. You
don't need to make a careful selection, since Elements figures out which area it
thinks
you want to include and creates the selection for you. A simple line should do it. As
you drag, Elements applies the adjustment you chose in step 2 (and an Adjustment
layer appears in your Layers panel).
4.
If necessary, tweak the selection
.
If Elements didn't quite select everything you want, then add to the selection by
brushing again. (If you've got the Tool Options area's Inverse checkbox turned