Graphics Programs Reference
In-Depth Information
7. Expand the
Plates
group in the Object Manager. Press and hold
the left mouse button on the
matPlates
in the Material Manager
and drag the cursor on
Plate.1
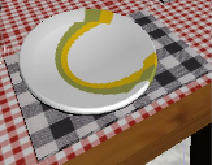
. You will notice that the texture is
not projected properly, as shown in Figure 5-32.
Figure 5-32
The Plates Material applied to Plate.1
8. Make sure that the
Texture Tag “matPlates”
texture tag is selected in the Object Man-
ager. Next, choose the
Tag
button; the
Tag Properties
area is displayed. In this area,
select
Cubic
from
Projection
drop-down list. Make sure that
Tile
check box is selected.
The
Cubic
projection type is used to project the texture on all sides of cube.
9. In the
Tag Properties
area, set the parameters as follows:
Offset U:
4
Offset V:
1
Length U:
93
Length V:
106
10. Choose the
Coordinates
button; the
Coordinates
area is displayed. In this area, set the
parameters as follows:
P . Y:
-42
P . Z:
3
S . X:
90
S .Y:
67
S . Z:
78
After entering the values, the
Plates Material
texture is placed on
Plate.1
.
Next, you will apply the texture to other plates in the scene.
11. Press and hold the left mouse button on the
Texture Tag “matPlates”
in the Object
Manager along with the CTRL key and then drag the cursor on
Plate.2
,
Plate.3
,
Plate.4
,
Plate.5
, and
Plate.6
one by one; all the plates are textured, as shown in Figure 5-33.
Search WWH ::

Custom Search