Graphics Programs Reference
In-Depth Information
2.
Select Level 2B, and you'll see two items at the right endpoint with which you'll need to
interact: the 3D indicator and the lock symbol. First, click the lock symbol to unlock the
right endpoint. This will allow you to move the endpoint for the selected level without
affecting all the other levels.
3.
Click the 3D indicator so that it changes to 2D. Now you are ready to modify the 2D
extents of the level.
4.
Drag the 2D extents grip (the solid circle) to the right. The result should look like the
image shown in Figure 2.29.
Figure 2.29
Adjusting the
graphic extents
of a level
Add Elbow
command
3D extents grip
2D extents grip
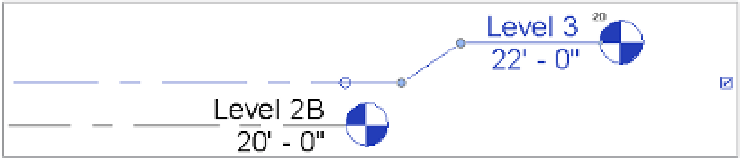
5.
As a final option, you can choose to break the end of a level or grid line so that the tag or
label will clearly display. Click the Add Elbow symbol near the label at the right endpoint
of Level 3. We have indicated the location of this symbol in Figure 2.29.
6.
Use the additional line grips to adjust the level endpoint so that it resembles the image
shown in Figure 2.30.
Figure 2.30
Adding an elbow
to a level
Propagating extents
Quite often you will adjust the extents of datum objects that need to be replicated in several
other views. Fortunately, there is a tool to help you accomplish this—Propagate Extents. While
the premise of this tool is simple, you must be aware of the subtleties in applying it to a three-
dimensional model.
The Propagate Extents tool pushes any modifications you apply to a datum object from one
view to other parallel views of your choosing. This tool does not work well on levels because
the parallel views are essentially mirrored views of each other. For example, the orientation
of the South elevation is the opposite of the North elevation; therefore, if you make a change to
the extents at the right end of a level in the South elevation, those changes would be propagated
to the left end in the North elevation.