Graphics Programs Reference
In-Depth Information
A 15 frames-per-second (fps) frame rate is minimal to keep the animation smooth. But if you
increased the frame rate, the animation length would shorten and it would seem like you were
running (rather than walking) through the scene. What can you do to have a longer animation
without adding speed? Simply add more frames to your animation.
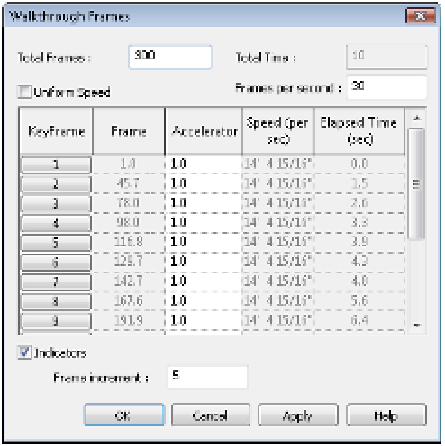
From the Properties palette, once again open the Walkthrough Frames dialog box
(Figure 11.59). By increasing the Total Frames value, you can also adjust the relative frames per
second (fps) to maintain the desired speed.
Figure 11.59
Default frame count
So, for example, if you wanted to increase the fps to 30 but maintain the same travel speed,
you would also increase the Total Frames setting to 600.
Finally, where a lot of people struggle is with the speed of their animation. Unless you're
breaking up your animation into separate paths (which will be combined later into a single
sequence), it's necessary to be able to speed up or slow down your camera's movement. In Revit,
you can uncheck the Uniform Speed option to speed up or slow down the camera during a
single animation study.
The same visual effect plays a part in your renderings. The farther you are from something,
the faster your camera can move as you fly by and still seem smooth and fluid. But you will
need to slow down considerably if you're walking through the building, where a comfortable
pace is 6 to 8 feet (2 to 2.5 meters) per second.
We've exported the animation from this portion of the chapter. It's important to understand
that when Revit exports video, it exports in an uncompressed format. The file sizes will be large
compared to what you might be used to. Any of the videos can be brought into other video-
editing tools (iMovie, HandBrake, Movie Maker, and so on) to compress the raw footage. If you