Graphics Programs Reference
In-Depth Information
Once the door in the group is selected, you'll notice an icon pointing to the door. Clicking
this icon will allow you to exclude the door as an exception to the group. The icon will change
and show a red hash through it. This means the element is now excluded and will automatically
be deleted when you deselect the group. The wall will heal itself as if the door were never there.
How can you tell if a given group has elements that have been excluded? Selecting the group
will reveal any hidden elements in the group that are excluded (Figure 10.48). Just tab through to
select the hidden door to include the component back into the group.
Figure 10.48
excluded group
elements will
display when the
group is selected.
Saving and Loading Groups
Even though we stress the fact that Revit is a whole-process BIM application (by integrating the
modeling, documentation, and multiuser workflow into one database), there are times when
you'll want to share the data across many files.
Just as you wouldn't want your family components locked up inside a project file, there are
good reasons to keep commonly used groups outside your project. You might even want to
keep them in a folder just as you do your custom content so you can use them again on similar
projects or as part of your office's library. You can do so by saving groups outside your projects.
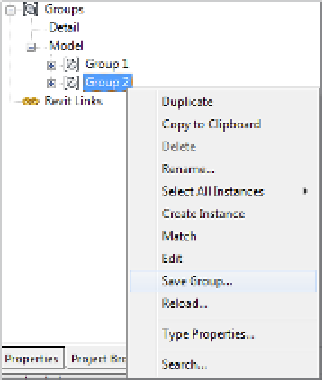
Saving groups is a simple matter of right-clicking the group name in your Project Browser
and selecting Save Group (Figure 10.49).
Figure 10.49
saving groups
from the Project
Browser


