Game Development Reference
In-Depth Information
Tips and Tricks
It's important to note that the background color is an attribute of a
camera. This means that changes to the background color can only be
seen through the camera. If Main Camera is selected in the Hierarchy,
a little Camera Preview window will be set within the Scene window
(Unity 3 or later only). Or, by bringing the Game window forward by
clicking its tab, the background color changes will also become apparent.
But, the background change will not be shown in the Scene window.
Note that this also means different cameras can have different background
colors. So if another camera is providing a map view or a night-vision view,
that camera can have its own black (or whatever) color. Background color
affects cameras, not the actual environment.
Step 14:
Activate fog. Choose Edit>Render Settings (which will open in
the Inspector). Click the Fog check box.
Step 15:
Change the Fog Color to match background. Still in the Render
Settings, the Fog Color has a long color swatch similar to the Background
Color setting. Click this swatch and change the color to match the
background (in my case 89, 101, 120, 255).
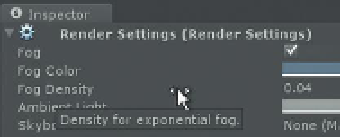
Step 16:
Adjust the Fog Density. The higher the Fog Density value is, the
closer the fog obscures objects. This value can be adjusted in a couple of
ways, either by clicking the numerical value and entering a new one or
by moving the mouse up to the Fog Density word and click-dragging left
or right (the cursor will have a double-tipped arrow appear (
Figure 6.7
).
Adjust to about
0.04
(although change this to your taste).
Figure 6.7
Adjusting value by dragging left and right on the variable's word.
Tips and Tricks
Generally, I find that dragging values can sometimes be a little tricky (it either
slides way too high too quickly or never seems to move at all). A lot depends
on the situation, but a quick way to work is to drag the value higher or lower
to get in the general neighborhood of the value (and thus the look) that you
are after. Then, for the fine-tuning, numerically tweak the value to taste.
Wrapping Up
The screenshot in
Figure 6.8
shows the current results of water, fog, and
background color adjustments made in this tutorial. Notice that the water
may be a different color than yours. This comes from some tweaking made to
the scene after all the previous steps were complete. You should do this too to
make the water look as you'd like.