Graphics Programs Reference
In-Depth Information
To add the logo to the home page using the Insert panel:
◗
1.
Reset the Dreamweaver workspace to the
Designer
configuration, open the
NextBest Fest
site you modified in Tutorial 4, and then open the
index.html
page in Design view. Click in the upper-left corner of the content div, if necessary
to place the insertion point in the upper-left corner of the content div. The home
page opens with the insertion point in the upper-left corner of the content div.
◗
2.
In the status bar, select the
<div#content>
tag, and then press the
Left
arrow
key. Although the pointer still appears in the content area of the page, the inser-
tion point moved before the content div in the code.
◗
3.
Switch to
Code
view, confirm that the insertion point is positioned directly before
the content div in the code, and then return to
Design
view.
◗
4.
In the
Common
category of the Insert panel, click the
Images button arrow
, and
then click the
Image
button. The Select Image Source dialog box opens.
◗
5.
Navigate to the
Tutorial.05\Tutorial
folder included with your Data Files, and
then click the
nb_logo.gif
graphic file. The Image preview box shows the graphic
and lists its specifications.
◗
6.
Click the
OK
button. The Image Tag Accessibility Attributes dialog box opens.
◗
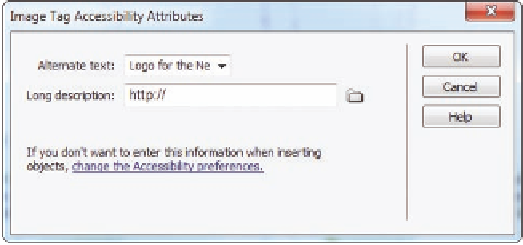
7.
Type
Logo for the NextBest Fest and link to the home page of the site
. See
Figure 5-5.
Figure 5-5
Image Tag Accessibility Attributes dialog box
short alt text description
◗
8.
Click the
OK
button. A copy of the NextBest Fest logo is saved in the graphics
folder in the site's local root folder. The image appears at the top of the page
behind the tickets div and is selected. The content div moves lower in the page
because you set a 150 px top margin for the div in its CSS style.
◗
9.
Collapse the CSS Styles panel and, in the Files panel, next to the graphics folder,
click the
Plus (+)
button to view the folder's contents. See Figure 5-6.


Search WWH ::

Custom Search