Graphics Programs Reference
In-Depth Information
2.
Apply the adjustments you want as part of the preset.
For example, we often apply a
combination of a Curve adjustment to add a small amount of midtone contrast, along
with some Definition and some Edge Sharpening. It's a good idea to be fairly conserva-
tive as you set the sliders, although all adjustments that are applied via a preset can be
tweaked by adjusting the sliders later in the Adjustments panel.
3.
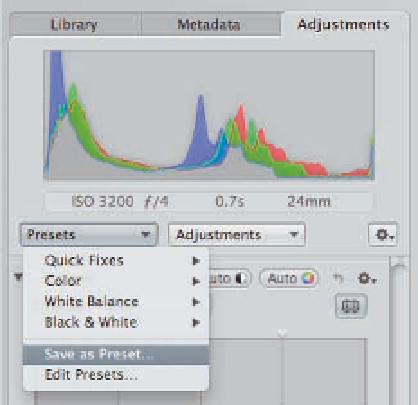
Go to the Presets pop-up menu that's
in the Adjustments panel, as shown
in Figure 2.18, and choose Save as
Preset.
The Adjustment Presets dialog
appears.
4.
Assign a descriptive name in the
Adjustment Presets dialog so that
later you remember exactly what the
preset does.
Your customized presets
will appear in the list of adjustment pre-
sets in the Import panel in addition to
the default presets.
2.18
Create customized adjustment presets from
scratch within the Adjustments panel in Aperture
and apply them in the Import panel.
If you make a series of your own presets, or
download and import custom presets, you can
group them together by doing the following:
1.
Choose Presets
➪
Edit Presets.
This displays the Preset Manager.
2.
Click the Action pop-up menu and choose New Preset Group.
3.
Drag as many presets into the new group as you want.
That way you can keep your
presets organized and easy to find.
By taking advantage of the metadata and adjustment presets in the Import panel, you'll have con-
siderably less work to do later.
Configuring what types of files to import
Because many digital cameras now include options to capture video and audio files as well as
photos, Aperture 3 gives you the option to exclude certain types of files or to only include specific
types of files while importing from your memory card. That way only the types of files that you're